Showing posts with label Revlon. Show all posts

Nail Art Tutorial: Cobwebs

This is the first instance I'd be sharing a freehand cobweb nail art for Halloween. I wanted a more realistic feel of spider webs every time I include them on my designs, but failed miserably without using stamping plates. I gave it another try for this year's 2014 Halloween series and I really love how it turned out.

Take a look:

Cobwebs Nail Art Design by Simply Rins

Nail Art Tutorial: Itsy Bitsy and Hairy Spiders

This is the first for my Halloween nail art design series of 2014. If you are a new subscriber, every year I come up with a series of freehand nail art in time for Halloween. I also do this for Valentine's and Christmas. But I missed the last season of hearts. So to make up for it, I'm starting the Halloween series a little early this year. It is actually a yearly challenge that I quite enjoy.

Let's kickoff the Halloween nail designs here at Simply Rins with a video nail art tutorial. But first, take a look at what I came up with:

Itsy Bitsy and Hairy Spiders Nail Art Design by Simply Rins

Nail Art: Strawberry and More Strawberries

The Strawberry nail art is probably one of the favorites in the nail art community. There has been a lot of recreations over the years. It's easy to do and really looks attractive on the nails. It was actually one of the designs I first did when I was still starting as a nail art blogger. But as we develop our skills as a nail artist, we also develop our personal style and we find ways to put twists into existing nail designs. This is a challenge I welcomed as I recreated the famous Strawberry nail art once again.

Let me show you first how I painted it this time:

Strawberry and More Strawberries Nail Art Design by Simply Rins

Nail Art: Pastel Floral on Nude

One of my favorite color from the Revlon Nude Expressions nail polish collection is Mocha. I wore it right after reviewing the entire collection. I wanted a floral nail design to go with it. The idea is rather simple. I payed more attention to the colors instead of the design. I'll let you judge for yourself if this resulted good or bad.

This is how it looks:

Floral Pastel on Nude Nail Art Design

Revlon Nude Expressions Nail Polish Collection

If you like nude nail polishes, then I have a strong feeling that you'll enjoy going through this swatch post.

To say that this collection has been sitting on my polish rack untouched can be considered a crime against the nail polish community. As in, it has been waiting there for several months. I know, I know. How could I, right? Well, can I just say that life happened. But I'm really trying my best to make up for backlogs. So, here goes ...

I'll be sharing with you Revlon's Nude Expressions nail polish collection that they released last year. As the name suggests, all lacquers in this set has a neutral shade. I am not really a fan of nudes. But there are times that I like to wear them for subtlety.

I have swatched each bottle in a manner that I can show you how it looks like in full opacity. Please also note that everything was pictured with a layer of top coat.

There are 8 polishes in the collection, but I only have 7 to show you. Sadly, Sandy Nude was broken when I got it in the mail. I'll try to look for it at the mall and will update this post when I find one.

Okay, let's begin.

Revlon Porcelain

Revlon Moon Candy Nail Art Collection

Are you bored wearing plain nail polish? If you are, then perhaps this collection from Revlon will interest you. It's called Moon Candy and the colors are inspired by outer space. The set consists of 10 colors that comes in dual-end bottles. One end is a dark creme regular polish, while the other is a holographic glitter coat that gives an iridescent effect. The set allows a way of dressing up a regular manicure and I am particularly drawn to it because of its vampy shades that I think are good bases for the glitters.

Revlon Moon Candy Nail Art Collection

Revlon ColorStay Longwear Nail Enamel

It seems that the world is moving too fast. There's too much things to do with too little time. Time is becoming a luxury and even if having well-polished nails has become a lifestyle, going to a nail salon for a manicure can't be easily included on our schedule. The nail polish industry understands this and brands are now becoming conscious on coming up with polishes that stay beautiful on your nails for several days with minor or without chipping.

Revlon introduced its ColorStay Longwear Nail Enamel polish line that addressed that particular concern of not having to change your manicure as often because it chipped within a few days.

Revlon ColorStay Longwear Nail Enamel

Nail Art: Playing With Scandalous

I slept early on a Friday night only to be awaken by a barking dog outside my studio at 2:30am. I couldn't sleep after that so I decided to finally take pictures of the nail art I have been wearing for 2 days. I don't normally wait this long to take photos of a design but I was actually testing how long the pearl beads would hold.

I am talking about this:

Playing With Scandalous Nail Art Design
Playing With Scandalous Nail Art Design by Simply Rins

Nail Art: Spiderman

June has been a very emotional month and I'm glad it's ending. But one good thing I can look forward to before I say goodbye to June is to watch the latest Spiderman movie. Yes, I am a fan. Having said that, I could not watch without a matching nail art design. So I got busy a couple of nights ago and came up with this:

Spiderman Nail Art Design
Spiderman Nail Art Design by Simply Rins

Nail Art: Porcelain Look

I arrived at Manila Hotel Tent City by 5pm on June 24, 2012 to witness the Miss World Philippines 2012 Pageant Night. Special thanks to the organizers of the pageant and to TV5 for the privilege. The event required the ladies to be in evening wear and as much as I wanted to say that I got excited on what to wear, I was particularly excited for what nail art design I was going to wear. ;)

So I dug into my closet and found this peach turtle-neck dress. But I didn't have shoes to match so I dug deeper and found a royal blue (somewhat) dress that I think was appropriate for the occasion. I instantly knew what nail design I wanted after that.

Here is what I came up with:

Porcelain Look Nail Art Design
Porcelain Look Nail Art Design by Simply Rins

Revlon Classics

Here's another feature on Revlon nail polishes. This time, I have a few classic shades to share.

When I started my nail polish collection roughly 2 years ago, I barely had Revlon polishes. I remember one time I saw a few bottles and I guess I wasn't that encouraged to buy with only a few choices. It was only recently when I was given an opportunity to review them did I realize that I have been missing out on really good colors. And so when I got the chance to went to the mall again, I was happy to see that the Revlon stands are now offering more polish shades.

Revlon Nail Enamel
Revlon Nail Enamel - Classics


Let me first introduce you to Revlon 410 Dreamer, a creme periwinkle nail polish. Formula is a bit watery but is surprisingly opaque in 2 coatings. Application is not a problem and is slightly shiny without a top coat. If you're into pastels and loves dainty colors, you would probably love to wear this.

Revlon 410 Dreamer
Revlon 410 Dreamer


Next is Revlon 271 Extravagant. This is a frosted nail lacquer that plays between pink and purple shade. I used 2 coats in this swatch and it was enough for full coverage. Application can be tricky because the finish reveals brush strokes. This can easily be fixed by adding a top coat. I am not fond of such formula but if you're the type that loves shimmer, you might want a bottle of this.

Revlon 271 Extravagant


Revlon 750 Foxy is a slightly dark color with hint of silver shimmer. Formula is great that made application easy. It has a shiny finish even without a top coat. I am still a fan of dark brown shades but I'm not so sure the silver shimmer works for this color. I also got confused with the name because I was expecting something sexy. ;)

Revlon 750 Foxy
Revlon 750 Foxy


Whenever I see the word "charming", I am instantly reminded of fairly tales because of Prince Charming. I know it may sound corny but that's how my mind works with this word. Sigh. Anyway, below is Revlon 211 Charming, another creme light lavander nail polish. You'll need 2 coats for complete coverage. Application is superb and yes, I found the color... charming. I only have a few violet shades in my stash but I instantly fell in love this when I wore it. This would be perfect across all seasons.

Revlon 211 Charming
Revlon 211 Charming


I have a confession. I've recently been acquiring greens. I don't like them before but somehow it crawled into my heart. And Revlon 571 Posh is a basic green creme polish that I added to my list of green favorites. Formula is great and application is a breeze. I used 2 coats for full opacity. I can't wait to try some nail art ideas over Posh.

Revlon 571 Posh
Revlon 571 Posh


Next in line is Revlon 560 Zealous. For me, this looks like lime. It's a shimmer polish and is quite sheer. I applied 3 coatings for full coverage. Regardless, I liked it. I don't have anything in my stash that came close to Zealous. It applies easily and I think this color is perfect for summer. It looks lovely under the sun.

Revlon 560 Zealous
Revlon 560 Zealous


Revlon 761 Scandalous is a dark purple nail polish with chunky purple glitters. I don't have anything like this in my polish collection. Well, simply because I am not that much of a fan of glittered polishes. But I find the vampy ones really sexy for formals or cocktail events. Anyway, Scandalous can be worn as a top coat or by itself. I decided to use it as is and applied 4 coats for full coverage. I really wanted to get a lot of that chunky glitters on. As most glittered polishes, application was easy. It finishes with a very dark background which I think was perfect to make the purple glitters stand out. I love it!

Revlon 761 Scandalous


Finally, here's Revlon 650 Saucy. Well, I always save my favorite for last. Saucy is a red shimmered nail lacquer. Formula is great. It can be a one coater but I decided to use 2 coats just because I am OC. Application is a breeze. The name actually reminds me of ketchup but I don't think this color is close to that. In any way, I found this shade really sexy. Yes, I am a sucker for reds. It has been my all-time favorite color.

Revlon 650 Saucy
Revlon 650 Saucy


I have visited a lot of nail salons in the metro and I have to say that I rarely see Revlon nail polishes in their shelves. I wonder why. They are relatively cheaper compared to other international brands and they have a good variety of interesting colors. Oh, I also have to mention that I like the polish brushes that comes with Revlon nail lacquers -- long and slim. I have very small nail beds that it is easier for me to work with such brushes.

Any favorite among these 8 colors?


Disclosure: All polishes included here were sent by Revlon Philippines for consideration. Under no circumstance did it influence this personal and impartial review. You may read my Disclosure Policy here.

Nail Art: Falling Daisies

After trying a few polishes from the Revlon Top Speed Fast Dry Nail Enamel collection, I instantly fell in love with Espresso. So I decided to wear it the following day and after, decided to paint daisies that I think was perfect for this color.

Falling Daisies Nail Art Design
Falling Daisies Nail Art Design by Simply Rins


My idea was to create a falling effect. I painted the daisies near the cuticle area to achieve that. The daisies on top were painted partially to appear as if they're peeping out and 1 daisy was painted near the nail tip.

Falling Daisies Nail Art Design


I used 2 coats of Revlon Top Speed Espresso. As per review, application was easy and since it dried quite fast, I didn't need to wait that long to paint the design. I used acrylic paints and a detailing nail art brush to paint the daisies.

Falling Daisies Nail Art Design


By now you might have noticed my preference to daisies when it comes to floral designs. I really find this type of flower really classy and dainty. They popped out really well over this dark chocolate base color. If you like a more subtle design with these flowers, you might want to consider a more lighter background.

Falling Daisies Nail Art Design


If you're looking for a simple design that is easy and quick to do, I would suggest this. I haven't been able to spend that much time on my nails because of work and a persistent bad cold. This design was perfect to do given the situation.

What do you think of daisies on nails?

Revlon Top Speed Fast Dry Nail Enamel

After preparing the swatches for this post, I now have a deeper admiration for nail bloggers because now I understand the effort that comes with swatching nail polishes. If you have been following this blog for quite some time, you probably noticed that I rarely swatch. I simply mention or include a photo of my nail art with the nail lacquer I used as base color in my nail art posts. The main reason for this is that all my polishes when I started this nail art blog were from (super) previous collections and I felt that including a swatch on a post would be useless. Thanks to this project, I now realize that it is also important to show the beauty of a nail lacquer along with the nail art design.

Anyway, I have here some Revlon Top Speed nail polishes that I'd like to share.

Revlon Top Speed


The Revlon Top Speed Fast Dry Nail Enamel collection consists of 32 colors that promises to dry as quickly as 60 seconds. It has a built-in top coat so you can simply wear each one by themselves and is said to have a smooth, shiny finish. I still recommend applying a base coat to protect your natural nails before polishing.

Swatches:

Before every swatching, I apply a thin layer of base coat. Based on experience, even a quick swatch can sometimes stain the nails especially with highly pigmented nail polishes. I find it easier to remove the polishes when I use a base coat.

Let's start with 405 Peachy. It's a ... well, a peach creme nail polish. Almost opaque with 1 coating, but needs 2 coats for full coverage. Application was a breeze and dries to a smooth and shiny finish. This is actually my first coral shade nail lacquer. I am not particularly fond of the color because I'm not so sure it complements my skin tone.

Revlon Top Speed Peachy


Next is 305 Electric, a bright and shimmery yellow polish. I used 3 coatings for full coverage and had no problem with application. Most yellows I've tried were streaky. Electric isn't. I am also not a yellow person but I am surprised to have liked this specific shade. I think it's perfect for summer. It has a not so shiny finish that I like as well. The color is bright enough as it is and I don't think it needs the extra shine.

Revlon Top Speed Electric


650 Sugar Plum is another shimmer polish from the Revlon Top Speed collection. It is a purple shade with a hint of dark pink. 2 layers is enough to reach full opacity but I wore it in 3 coats to bring out more shimmer. Application was easy. I expected this to dry to a more shiny finish but it didn't. A layer of top coat could easily remedy this if you prefer it to be more shiny.

Revlon Top Speed Sugar Plum


I love this next one -- 820 Stormy, a brownish-grey creme nail polish and it dries really shiny! Complete coverage with 2 coats and application was easy as 1-2-3. I don't think I have a polish in my stash that could come close to Stormy. I can't wait to create some nail design for this one. If you are looking for something that would complement a professional look, I recommend you get this shade. I find this a very versatile color.

Revlon Top Speed Cloud


I swatched 730 Royal next. I assumed it was named as such because this is a lovely royal blue creme nail polish from Revlon. I applied 2 coats for full coverage. Application can be tricky since it has a very watery consistency. Be careful not to load the brush with too much of this polish to avoid a polish mess. You also do not want polish on your cuticles and skin. Regardless, I love this shade! I find it bold and daring. It dried not so shiny so I added a layer of top coat. I think this color would look gorgeous with more shine. If you are feeling adventurous, you will definitely like this.

Revlon Top Speed Royal


Next in line was 830 Golden. It's a subtle gold polish with some shimmer. No problems with application. I used 3 coats to bring out more of the gold. Golden dried not that shiny which was quite disappointing because I expected this color to have more brilliance. Regardless, I think it is a beautiful shade. This would be perfect for people looking for subtlety.

Revlon Top Speed Golden


This is my favorite among the batch that I've tried -- 840 Espresso. I think I'll always be that girl who prefers darker shades. Espresso is a dark chocolate brown shimmered nail polish. It looks very flattering. I used 2 coats to reach full opacity and it dries with a good shiny finish. I added a layer of top coat to bring out more shine. I think it looked yummier. I could wear this everyday.

Revlon Top Speed Espresso


Of course I saved my all-time favorite color for last. Meet 510 Fire. It's a gorgeous basic red creme nail lacquer from Revlon Top Speed collection and I love it! Can be worn with 1 coating but I preferred wearing it in 2 coats. If I had a whiter skin tone, this color would look absolutely stunning. Fire has a very shiny finish. No need for additional shine. This shade is for every confident woman. And if you ever want to feel sexy, I am quite sure this would do the trick. ;)

Revlon Top Speed Fire


Personal Insights:
  • Each bottle of will vary in finish because of different consistencies. It will also depend on how the polish was applied.
  • True to its promise, one coat dries in a minute. If you wear it in more than 1 coating, it is dry to touch in a minute but needs a few more minutes to completely dry.
  • Does not last long on nails if worn without a top coat.
  • I like that the collection as a vast array of colors to choose from. It ranges from pastels to darks and from cremes to shimmers. The possibility of finding a shade that would tickle your personal preference is almost at 100%.
  • The brush is amazingly easy to work with.

Revlon Top Speed nail polishes are available at SM Department Stores, Watsons, PCX or Personal Exchange, and Landmark for approximately Php250 ($6) per bottle.

I'm looking forward to creating some nail designs using some of these nail polishes. I only wish there were more days in a week so I could squeeze more time for nail painting.

Have you tried a polish from this collection? What's your favorite?


Disclosure: All polishes included here were sent by Revlon Philippines for consideration. Under no circumstance did it influence this personal and impartial review. You may read my Disclosure Policy here.

Nail Art Tutorial: Christmas Tree ala Polka Dots

Filipinos are known for setting up Christmas trees as early as November in celebration of the season. We take pleasure in decorating our homes. It is not really surprising since we are known for our festivals and merriment ways. But there are still those that like to keep it simple. This Christmas nail art design and I, included.

Here is a simple way of painting a Christmas tree on your nails. All you need are dotting tools because this tree is made out of dots!

Christmas Tree ala Polka Dots Nail Art Design
Christmas Tree ala Polka Dots Nail Art Design by Simply Rins


I have been getting requests for a simple Christmas nail art that would be very manageable for nail art beginners to try. I hope that this would give them an idea. Polka dots are really versatile!

Christmas Tree ala Polka Dots Nail Art Design


Base color for accent nail is 2 coats of OPI Alpine White and I polished my other nails with Revlon Emerald City. The latter is actually a matte finish but decided to wear it with a top coat. Only shiny things for Christmas.

I brought out that small Christmas tree my sister gave me last year when December stepped in. It is now sitting on top of my personal nail station.

Christmas Tree ala Polka Dots Nail Art Design
A mini Christmas tree on top of my mini personal nail station.


I used 5 different shades of green nail polish to create the Christmas tree. An option would be to just use one color. But I personally prefer using different shades just to make it more interesting. And for a little contrast, I added bright red dots to mimic Christmas balls as decoration for the tree.

Christmas Tree ala Polka Dots Nail Art Design


I also decided to dab different sizes of dots at random for this Christmas tree nail art. You may choose to just use one size if you like. The idea is to experiment on what appeals to you. Before I decided on this design, I practiced on a piece of scratch paper so that I'll know how it will look before I start painting on my nails. Since you will be working with nail polish, the practice is recommended. You don't want the hassle of reapplying a polish because you made a mistake.

Christmas Tree ala Polka Dots Nail Art Design


It is unusual for me to leave my other nails plain. But this is to show that nail art need not be elaborate. The question is what is comfortable for you to wear. It really doesn't matter how simple or how many nails you decorate. :)

To show you how I did this Christmas tree nail design using just dots, here's a tutorial:


Thank you for watching! I hope you found this nail art interesting to try.

Nail Art: Hello Kitty

I've been receiving requests for a Hello Kitty nail art design since last year and I finally came to doing it! Yey! I do apologize for the delay as sometimes, my head is preoccupied with other nail designs and it is quite difficult to figure out what to do first!

Anyway, two weeks ago, I asked my sister if she could grow her nails longer as usual as I wanted to do some nail designs on her. She gladly obliged. She agreed to wear the Hello Kitty nail art for me and for all Simply Rins' readers!

Hello Kitty nail art design
Hello Kitty nail art design by Simply Rins


I painted Hello Kitty on both her ring fingers and polka dots on all other nails. Yes, you can say that I'm into dots these days as I find them simple and classy at the same time. For the base color, I used Revlon Cherries in the Snow. Opaque with one coating but still decided to use 2 layers for this Hello Kitty nail design.

Nail Art: Earth Hour

Simply Rins supports Earth Hour. Do you?

Every year, World Wildlife Fund (WWF) encourages everyone to participate in a global and annual event called Earth Hour. Every last Saturday of March, WWF is asking us to switch of unnecessary lights and appliances for one (1) hour. The objective is to promote awareness on the rising climate change and that we have a responsibility to do something about it.

With all the recent natural disasters happening around the world, to be indifferent is to be heartless. We all need to take care of Mother Earth. I made an Earth Hour nail design as my personal way of support for WWF's Earth Hour and hopefully it this nail art can help in spreading the word about this worthy event.

Earth Hour Nail Art
Earth Hour nail art design by Simply Rins!


I have 3 accent nails on this Earth Hour nail art -- on my 2 pointer finger and on my right hand's ring finger. I painted the earth, the number 60 that represents the no. of minutes in an hour, and a light bulb to signify that we are encouraged to turn off our lights on the 26th of March 2011 from 8:30 to 9:30pm in support of Earth Hour.

Here are the base colors:

Nail Art: Year of the Rabbit / Bugs Bunny

2011 is the year of the rabbit based on the Chinese zodiac year so I figured it's just appropriate to do a nail art featuring the most famous rabbit in the world -- Bugs Bunny! According to my Chinese partner, technically speaking, the year of the rabbit will start on February 03, 2011. And so this Bugs Bunny / Year of the Rabbit nail design came in advance. :)

bugs bunny year of the rabbit nail art
Bugs Bunny nail art by Simply Rins!


I did 2 accent nails, both on my ring fingers. The other nails were left plain with Faceshop BK901. This is my 1st holographic nail polish which I purchased at Faceshop. Application was easy and opaque in 2 coatings. For the accent nails, I used 2 coats of Lucidarling White. I painted bugs bunny using Revlon Silver Screen and used acrylic paint in all other colors.

Christmas Nail Art: Santa and Rudolph

This is my 4th installment for my Christmas nail art collection for December 2010. I just couldn't let the month pass without painting my nails with Santa Claus and his most famous reindeer -- Rudolph! I have 2 accent nails, as usual. :P

Christmas nail art santa and rudolph
Christmas nail art with Santa and Rudolph by Simply Rins


For base colors, I used Revlon Emerald City for my left ring finger, Lucidarling White on my right ring finger, and China Glaze China Rouge for all the other nails. These were all applied in 2 coats.

This design is quite versatile. If you don't feel like having an accent nail, the polka dots over a red color base is enough for a Christmas manicure.

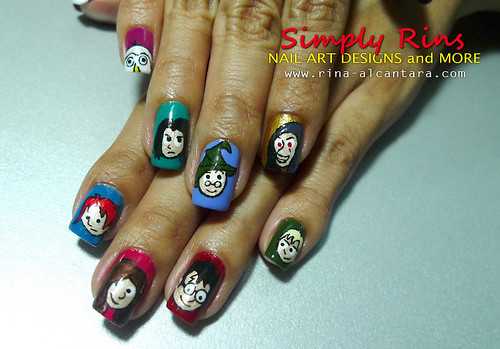
Nail Art: Harry Potter Characters

I confess that I went a little crazy and decided to do another Harry Potter nail art with 10 characters from the movie. I must say that this is perhaps the hardest challenge I gave myself. Freehand painting Harry Potter characters on my 10 nails tested my endurance. It took me hours (many!) to finish this nail art design. Yes, this is how much I love the Harry Potter series! :)

Since I don't have any false nails to practice with, what I always do is draw my designs on paper first. Sometimes, I use colored pens to have an idea what it will look like in colors. This Harry Potter nail art, is again, in cartoons! I hope you will be able to recognize the characters.

Presenting ...

Nail Art Harry Potter Characters 02
Harry Potter character nail art by Simply Rins!


As you can see, I also went crazy with the base colors. I think it has to do with the fact that I'm trying to cheer myself up. I'm feeling quite low recently.

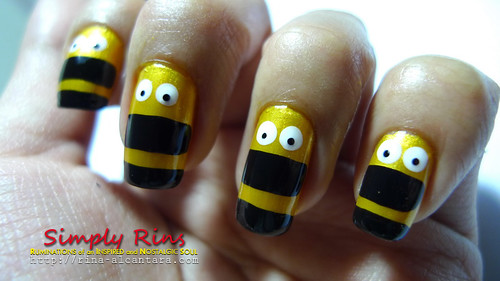
Nail Art: Nailed by Bees

I did this nail art design this week. I've been wanting to do a bee inspired design but I had a hard time finding a yellow polish that I really like. After searching and trying to come up with a simple design, this is what I came up with:

Nail Art Nailed by Bees 03
This is a layer of base coat, 3 layers of L.A. Colors NP413 (golden yellow), Elianto Twilight Zone for the bee stripes, and Revlon white on white for the eyes.


I first used a basic yellow color but I preferred this golden shade. Here are all the polishes that I used: