In 3 weeks, the whole world will be celebrating Valentine's Day. I am secretly a big fan. Receiving flowers always make my heart skip a beat. I can't remember the last time I got flowers, but I can remember the last time I adorn my nails with florals and hearts to celebrate the day of hearts. I still don't know what Valentine's nail art I'll be actually wearing on the 14th of February. But perhaps I can start sharing with you a few ideas and hopefully you'll get some inspiration for your nails.
I have no legit excuse for my absence of almost 2 weeks except that I was uninspired. It's like having a writer's block and you don't know what to do. Well, until a night ago when I got an idea for a nail art. But before anything else, I'd like to say that November 2014 marks the 5th year anniversary of my blog! I can't believe that it has been that long already. Although I started blogging in 2009, my nail art posts only began mid of the following year. Regardless, I am thankful to all of you who have supported me and for all the blessings this blog have received.
To celebrate, I wanted something bright on my nails. I wanted yellow. And after a few hours of simultaneously watching a movie on my laptop and doing my nails, this nail design came to be:
When I moved to the new place a few months ago, I adopted a stray cat and named her "Floozie". Not that she is one, I really just like that name. I actually used that as a character name when I was still into online gaming. A shocking revelation? But let's not get into that. It was too long ago since I played. This post is about how my feline friend inspired this freehand nail art.
It is my first time to have a cat as a pet. We always had a dog. And Floozie wasn't a domesticated cat when she came into my life (or house). I didn't know much about cats. So during the times I tried to bath, cuddle, or play with her, I sometimes get scratched. I have a lot on my legs and arms. Thankfully, she is more at peace with me now and I have less and less scratches.
This nail art is to remember her (playful) scratches:
I'll be on a mini break by the time this post gets published. I will be joining a few fellow bloggers for the Peñafrancia Festival 2013 in Naga City, Camarines Sur this weekend and naturally, I'd like my nails to match the occasion. I wanted 2 things -- a colorful nail art design and that it should be easy to do because I was pressed for time. Yes, I only had time to do my nails the night before my flight. Talk about cramming!!
Here is the outcome after an hour of DIY nail art session:
I received an email last week asking me for some personal tips on how to paint straight lines using a stripping nail art brush. Most nail artists would probably say that it is best practice to move your nails instead of the brush when painting lines. I agree. I was composing my reply with this suggestion until I realized that perhaps it is better to tell her to use shortcomings to create beautiful nail art. We all have our strengths and weaknesses. We cannot let the latter bring us down, right?
And so here I am sharing with you a hand-painted nail art wherein straight lines were not welcomed. I fondly titled this -- I Can't Draw a Straight Line.
This hand-painted nail art was inspired by a color and it all started when I was fixing my closet. Let me tell you its story ...
It's summer here in the Philippines and the heat has made me lazy to do my nails. Aside from that, work has been getting most of my time. The moment I get to my studio for some "me" time, all I want to do is go to bed. But last night was different.
I was arranging my clothes and found a handful of orange shirts. That took me by surprise. As I am not fond of pinks, I am also not fond of orange, especially on my nails. I think it doesn't compliment my skin tone. Anyway, I then thought of doing some nail art inspired by the color. So I stopped what I was doing and began painting my nails.
I was having an early dinner last weekend when I received a text message from a friend who asked me how I was. I wanted to reply that I was feeling lonely but said I was fine instead. I've realized that no matter how used I am to being alone, one can sometimes be a lonely number. And even though I have met some that showed interest, I can't seem to bring down the wall I have put up. Can I blame the number of times I've been broken?
My best friend these days has been unavailable so I decided to channel my feelings the best way I know how -- through nail art.
Wall was the idea. The question is how I'd be able to convey that in a nail design. I figured a brick wall inspired design would do the job. The concept is not original as there have been several nail art bloggers who have done their version of the bricks nails. So in order to put some personal flair into this design, I decided to use a purple palette and alter the brick placements.
I simply called this Purple Bricks Nail Art Design. Take a look:
It has been almost 3 weeks since I've last painted my nails ... and blogged, too. At first, I got depressed by a series of copyright infringement. No matter how hard I try to set aside how I feel about people stealing designs and photos, I always find myself deeply attached to my craft. It is never overacting for an artist to ask for respect. Anyway, I had a minor accident when I finally got an inspiration. I fell down a stairs and used my right hand to break my fall. I didn't have a sprain but my right wrist was slightly hurt.
I took my blogging absence as a breather and it actually allowed to me to take a step back and reevaluate my blog. For my comeback, I decided on something simple to do as I didn't want to strain my right hand just yet. It was a battle between polka dots and stripes. Well, the latter won.
I simply called this Colored Stripes because it is simply that.
The cupcake nail art design will always have a special place in my heart and I will probably be emotional about it everytime I wear it or see other nail art enthusiast recreate the design. It was my first freehand nail art that paved the way for my nail art blog to be recognized.
My version of the cupcake nail art has been revived countless time and it made me a proud mama! I published the design on August 2010 that I simply titled Nail Art: Cupcakes. The idea was to come up with a method that would make painting cupcakes on nails easy. Reading the post brought back a lot of memories and it made me realize how much I've grown as a nail artist / blogger.
Let me share with you once more the cupcake nail art with a little twist:
A few days ago, I was challenged to create a nail art design that mimics a fashion trend. The challenge came from a nail art contest that megastyleph organized. I actually posted about it here.
Each participant was asked to browse the megastyle website for fashion trends and create a nail design inspired by that. I spotted a photo of accessorizing classic pieces to create a twist and I thought it was perfect to my style of nail art. This is what I came up with:
I am back for more nail art designs after a very long hiatus. To start things off after a frustrating few weeks, I decided to create something simple, something easy to do. I painted small flowers in random places on all my nails with hope that this would bring some cheer to my gloomy mood. I named this Scattered Flowers simply because they are.
Scattered Flowers Nail Art Designs by Simply Rins
I have always believed that flowers are classy when it comes to nail art designs and you don't need to paint them with lots of details to create something beautiful.
For background color, I chose China Glaze Kinetic Candy in 2 coats. I had no problems with the application, no streak marks to worry while doing so. Kinetic Candy is a recent purchase from Digital Traincase and I have been meaning to use it since I got it barely 2 weeks ago. This is a perfect base color for spring or summer. I can see myself using this for more nail designs in the future.
I hand painted the flowers on my nails using acrylic paint and a detailing nail art brush. They are small 5-petal flowers in pink, a color that I think would really pop on our background color. I also added a few white dots to fill in awkward places around each nail. If you have been following this nail art blog for some time now, you'll probably notice my preference to add tiny dots as details to my nail designs. I really think it gives the nail art a little extra.
I submitted this design to a magazine and the feature would include a tutorial. I'll be waiting for it to come out before I share more details with you. As for now, I am quite excited. :)
If you are a nail art beginner and would love to try some freehand design, I would recommend you try this. It is simple enough to paint on both your hands.
This particular nail art is for my friend, Rachelle. I met her just last year. We were both taking an internet marketing class. It was not hard to get along with her. She was very friendly and approachable. One thing you will love about Rachelle is her smile. She never rans out of it and she is definitely the most cheerful person I know.
She recently started a blog called Memos from the Purple Couch with an inspiring tagline -- Can we laugh our way to becoming an empire? She has proclaimed herself CEO, Cheer Executive Officer and everyone agrees it fits her perfectly. Anyway, she has been requesting a rainbow inspired nail art design ever since she found out I was into nail painting. After what seems like forever, I finally got some inspiration on how I wanted this to look like.
Dripping Rainbow Nail Art Design by Simply Rins
An open letter:
Dear Rachelle,
I'm sorry it took me a very long time to create the rainbow nails that you have been requesting. I never forgotten about it. I know that this nail design has been recreated so many times and I really just wanted to come up with something different for you. I hope the wait was worth it and that you'll like what I came up with. Your outlook in life has been inspiring and the rainbow is perfect to represent your cheerful personality.
Simply,
Rins
I was deliberating whether to use black or white as background. The latter won. I was afraid a dark background will create a gloomy effect regardless of the colors. I opted to use China Glaze Moonlight in 3 coatings to achieve full opacity. This is a very sheer polish and I love it regardless the fact that I needed to apply 3 thin layers. It has a translucent feel to it that I really love and application is easy.
I hand painted the rainbow design using acrylic paints and a detailing nail art brush.
My worry about creating a rainbow inspired nail art is how I'll be separating the colors neatly and I really wanted to add a twist to it. This is when I thought of the dripping effect. It eliminated the need for perfect brush strokes and consequently, I knew that it would not be time consuming.
I used the acronym ROYGBIV (red, orange, yellow, green, blue, indigo, and violet) as guide for the rainbow colors. To make it easier for me to evenly space the width of each color on my nails, I decided to start at the center using the green color, which is the center color of the rainbow.
The length of each color was painted in random and I added a small blob at the end of each to create that dripping effect. I was also conscious to show some brush strokes towards the end of each color to make the drips more visible.
I am quite happy with the results of this rainbow nail design. I would highly recommend this to nail art beginners. It is very easy to create because the need for perfect brush strokes is at a minimum. This makes it easy to work with your non-dominant hand since you're practically just doing one primary brush stroke, that is from the cuticle area down towards the nail tip.
To further demonstrate how I painted this nail design, here's a short tutorial:
Yet another thing I like about this design is the fact that it creates an illusion of longer nails. I hope my friend would forgive me for being so late to oblige to her request for rainbow inspired nail art. Oh, and I wish we could go out for dinner or coffee so I can show her my nails in person. That would be really amazing.
What are your thoughts on this Dripping Rainbow nail art design? I feel this would be perfect for summer.
If you don't want to miss any of my nail art designs or tutorial, please subscribe here.
I received a comment at the Simply Rins YouTube Channel, requesting a Valentine's inspired nail art that is cute and unique. The following day, I doodled some nail design ideas. I know hearts are overrated for the occasion but it was the only thing I wanted to paint on my nails. That night, I showed my sister 3 designs and asked her what she wanted best. She chose this cluttered hearts nail design and I obliged. ;)
Cluttered Hearts Nail Art Design by Simply Rins
I find this Valentine's inspired nail art design cute. I need your help though, in deciding if this is something unique. This is also a very simple freehand nail art that features an easy way of how to paint hearts.
I consider this a pink ombre nail art as I only used pink hues from the base color to the design itself. Base color is 2 coats of Zoya Sofia, a very dark pink with a hint of purple. Application is smooth and easy. I really wanted a dark base since I trimmed my nails and I think darker shades makes shorter nails look sexy.
I painted the design using acrylic paints. To achieve the ombre look, I used 2 shades of pink for the hearts and white for the small dots I added to fill in odd spaces.
If you remember my Flower Power Nail Art, this is very similar to that idea. But instead of flowers, I painted clustered hearts. I wanted to achieve that wallpaper effect again.
This is a fun yet simple nail design for Valentine's that would look great on short or long nails. For alternatives, use various color combinations according to your personal preference. At top of mind is two-toned combo, red and white or black and white perhaps. I think that would look elegant. The choice of colors can make a big difference on the outcome of a nail design.
Here's a closer look at this cluttered hearts:
I'd like to share with you this video nail tutorial of how I created this Valentine's nail art:
I know it's only January and we have a few more weeks before we celebrate the day of hearts, but I figured it's never too early to wear love on your nails.
What do you think of this nail design for Valentine's Day?
If you found this nail art tutorial helpful, please subscribe to Simply Rins to receive updates whenever a new tutorial or design is uploaded.
I was working on a project for a magazine one night and they particularly requested for a remake of the Cherry Blossoms nail art I did for my mother last year. Only to realize that I really didn't need to do it on my nails. They wanted some of my floral nail art recreated on a nail wheel or artificial nails. But since I did the Cherry Blossoms on my natural nails, I figured I'd share it here nevertheless.
Cherry Blossoms Nail Art Design by Simply Rins
This nail design has always been considered classy because of its simplicity and subtlety. Choose nude colors for base if you want to play it down and a more lively background color if you want it to be a little more interesting. In any which way you decide to wear it, it will always come out looking elegant.
For this remake, I decided to wear 2 coats of Misa Pay Days Are Happy Days as base color. I hand painted the cherry blossoms using acrylic paints, striping and detailing nail art brushes. This is one of the polishes I bought from Digital Traincase. Do check out her online shop for the latest nail polish and cosmetics collections.
Here's a parting shot:
Have you tried a Cherry Blossoms nail design? What base color did or would like to use?
If you found this nail art post interesting, please subscribe to get updates whenever a new nail design is posted.
My first nail art for this year is an ombre. Gradient is a term I often use to refer to this kind of manicure but I was introduced to the term "ombre" that most nail art bloggers say in their posts. Honestly, I really don't know what it means. Thanks to ever dependable Google, I learned that it is a French word for shading.
I have been wanting to do something like this ever since I saw one but at the time, my nail polish stash is very limited in colors ... it is still until now, but has grown a little. When I finally decided to finally try one, brown was the first color that popped in my mind. So I looked for 5 nail lacquers that would create the look.
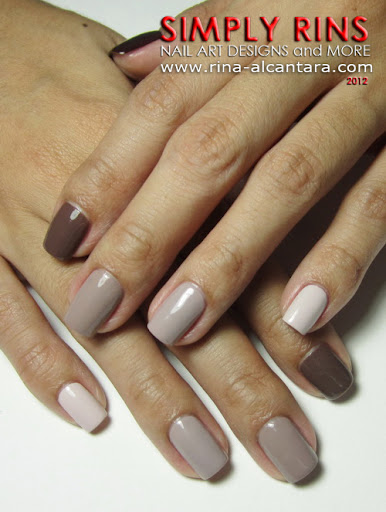
Here's my brown ombre manicure:
Brown Ombre Nail Art Design by Simply Rins
I polished the nail on my pinky with the lightest color and the darkest on my thumbnail. You can do it the other way around. It would really depend on your personal preference.
What I like about this nail art is its simplicity. I don't think it can get any simpler than this. If you know how to polish your own nails and you have the colors to work with, this is probably the simplest nail art ever! Also, if you're trying to get into nail art, I personally think this is a good start to be comfortable decorating your nails.
Here are the polishes I used, in 2 coats each:
Pinky: Orly Pure Porcelain
Ring: Misa Pay Days Are Happy Days
Middle: Orly Country Club Khaki
Index: Essie Mink Muffs
Thumb: Faceshop BR802
Important things to remember when creating an ombre nail art:
Work with nail polishes that have the same finish or texture.
The lightest color is not necessarily white.
If you can create an ombre nail art with subtle transitions of shades, I think that would look absolutely amazing.
I really liked how my first ombre manicure turned out. I plan to do more soon, especially with my favorite color. :)
After a few days of wearing this, I decided to add a design. Since it is still January, I wanted to wear something with dots. From where I am, we have this belief that wearing polka dots to welcome a new year will bring good luck and wealth. This is also the reason why we fill our pockets with coins too during the new year. Unfortunately, I do not own a single polka dot inspired piece of clothing. How sad is that? But it is never too late for anything, right? So I decided to add random dots on my ombre nails.
I used white, yellow, and pink nail polishes to create the dots in different sizes. I have mixed feelings with the outcome but I did love the color combination. I'm not sure if I should have used darker shades of colors for the dots.
What do you think?
P.S. My camera is with my sister for the weekend when I did this nail art. Thanks to nanay who lent me her digicam until I got mine back.
Another year is about to end. In a few days, a new year is upon us and we are given another chance to do things better. A lot of good things happened to me and this blog that I am thankful for. That deserves a separate blog post. For the meantime, I'd like to share with you a simple new year nail art design. I painted fireworks!
Fireworks Nail Art Design by Simply Rins
I chose Orly Goth in 2 coats as background color. The fireworks were painted using various colors of acrylic paints and a short striping nail art brush.
I also chose to paint different colors of fireworks in random places on all my nails. Another option is to have just one color for all the fireworks. But I guess fireworks is really a color display, so a lot of colors is in order.
My mom said that the design looks like a flower. Looking at it, I think she's right. But perhaps it can be both since fireworks do look like flowers without a center. I'm still happy with how this came out. It looks festive and the colors will fit perfectly for the celebration. When I look down on my nails, I can imagine mini firework displays. :)
The design appears complicated but it is relatively easy to do. Here's a video nail art tutorial that I prepared for this fireworks nail art design:
Filipinos are known for setting up Christmas trees as early as November in celebration of the season. We take pleasure in decorating our homes. It is not really surprising since we are known for our festivals and merriment ways. But there are still those that like to keep it simple. This Christmas nail art design and I, included.
Here is a simple way of painting a Christmas tree on your nails. All you need are dotting tools because this tree is made out of dots!
Christmas Tree ala Polka Dots Nail Art Design by Simply Rins
I have been getting requests for a simple Christmas nail art that would be very manageable for nail art beginners to try. I hope that this would give them an idea. Polka dots are really versatile!
Base color for accent nail is 2 coats of OPI Alpine White and I polished my other nails with Revlon Emerald City. The latter is actually a matte finish but decided to wear it with a top coat. Only shiny things for Christmas.
I brought out that small Christmas tree my sister gave me last year when December stepped in. It is now sitting on top of my personal nail station.
A mini Christmas tree on top of my mini personal nail station.
I used 5 different shades of green nail polish to create the Christmas tree. An option would be to just use one color. But I personally prefer using different shades just to make it more interesting. And for a little contrast, I added bright red dots to mimic Christmas balls as decoration for the tree.
I also decided to dab different sizes of dots at random for this Christmas tree nail art. You may choose to just use one size if you like. The idea is to experiment on what appeals to you. Before I decided on this design, I practiced on a piece of scratch paper so that I'll know how it will look before I start painting on my nails. Since you will be working with nail polish, the practice is recommended. You don't want the hassle of reapplying a polish because you made a mistake.
It is unusual for me to leave my other nails plain. But this is to show that nail art need not be elaborate. The question is what is comfortable for you to wear. It really doesn't matter how simple or how many nails you decorate. :)
To show you how I did this Christmas tree nail design using just dots, here's a tutorial:
Thank you for watching! I hope you found this nail art interesting to try.
After creating a Santa's Elves Nail Art, I thought of paying tribute to other "magical creatures" that help Santa Claus deliver all those wonderful presents during Christmas. I decided to come up with a reindeer nail art design!
This is a freehand Christmas nail art design that features reindeer!
Reindeer Nail Art Design by Simply Rins
I wanted to just create an accent nail at first. I thought of just painting Rudolph (the red-nosed reindeer) and paint some abstract design on the other nails. Not a bad idea, actually. But as I was polishing my nails, I think I went crazy because I decided to paint reindeer on all my nails!
Lesson learned: As I was typing the word "reindeer" with an s, the crooked red line keeps appearing underneath the word. So I looked up the plural of reindeer and learned that it is its singular and plural form!
All reindeer were painted using acrylic paint and a detailing nail art brush.
I used Orly Pure Porcelain in 2 coats as base color. White would have been my usual choice but I figured the slight pinkish shade of Pure Porcelain would give this reindeer nail art a more dainty feel. I think it did a good job.
We know that Santa Claus has 8 flying reindeer that pulls his sleigh on Christmas eve. They are named Dasher, Dancer, Prancer, Vixen, Comet, Cupid, Donder and Blitzen. These reindeer were popularized by a poem entitled "A Visit from St. Nicholas" or more popularly known as "Twas the Night Before Christmas". It was written by Clement Clarke Moore in 1822.
Take a look at the 8 reindeer I painted:
I just have to take a group shot!
By 1939, another reindeer was introduced to us by Robert L. May -- Rudolph the red-nosed reindeer! He was a copywriter working for Montgomery Ward department stores. The company asked him to create a new Christmas story that they could present to their shoppers as giveaways. Two years after, Robert's brother-in-law, Johnny Marks, came up with the "Rudolph the Red-Nosed Reindeer" song. Since then, Rudolph has become the most famous reindeer of Santa Claus that guides the other 8 reindeer with his shiny red nose.
I decided to paint Rudolph on my left thumbnail.
Rudolph and his date!
After painting Santa's 9 magical reindeer, I had a little problem of what to paint on my right thumbnail. I was seriously thinking of Santa Claus. But I still didn't want to paint him til December comes. So after tweaking a few more ideas, I decided to give Rudolph a date by drawing a female reindeer!
For the girl reindeer, I added a little red ribbon on her head.
This Christmas nail design has become one of my personal favorites. It brings a smile to my face whenever I look at them. Do you experience that sometimes on your nail designs? And so when I visited Don this week, I asked him to take some photos of my reindeer nail art. He is a brilliant photographer!
Photo in natural light, courtesy of Don
Photo in natural light, courtesy of Don
This is fairly an easy design to recreate. You may want to consider trying this design even if you are a nail art beginner. The shapes and lines that makes the reindeer are simple, even with your non-dominant hand.
I'm starting Christmas early here at Simply Rins by sharing with you my first Christmas nail art idea for this year. I decided to come up with something simple and festive. I recommend this for nail art beginners. It is relatively easy to do, even when you're working with your non-dominant hand.
My inspiration for this Christmas nail design is a popular decor for the season -- garlands!
Christmas Garlands Nail Art Designs by Simply Rins
For the base color, I used 1 coat of Orly Kiss The Bride and layered it with 2 coats of China Glaze Cloud Nine. I love this shimmer nail polish. It gives a subtle gold glitter that I think is perfect for the holidays.
left hand
I decided to paint the garlands differently on each hand. Red garlands for my left hand and green on my right. I used Color Club Ruby Slippers on my left hand and Orly Meet Me Under The Mistletoe on my other hand.
For a more garland effect, I used a dotting tool and used a dabbing technique to paint garlands on my nails. The lines that would serve as garlands is prettier with irregular edges.
right hand
I randomly placed gold micro beads for further details. These beads are almost always bleeders once you put a top coat over them. To make sure the bleed wouldn't be as evident, I was careful to place the micro beads inside the red and green glitter polishes that I used for the garlands.
You may opt to use more colors of the beads for a more festive look. As for me, I decided to just use one color -- gold, for this Christmas nail art design. Overall, I was satisfied with how this turned out. I found it interesting and classy. What do you think?