Showing posts with label Orly. Show all posts

Orly Commits Copyright Infringement

I've have been blogging about nail art for approximately 3 years as of date and I've had a good share of instances wherein my photos have been grabbed and edited without my consent. For a time, it was easy to set my frustrations aside. But when a big company such as Orly commits copyright infringement using one of my nail art photos, it is hard to ignore.

So how did Orly violated my rights? Sometime on September 23, 2013, Orly Australia posted this picture:

Orly Commits Copyright Infringement

Nail Art: Lined

I am currently swamped with backlogs here on my blog. I'm slowly attending to things and today, I'd like to share something simple. I actually submitted this nail art design for a local magazine. It includes a tutorial that I'll also post here in Simply Rins when it get published. For now, allow me to share with you some photos.

Lined Nail Art Design
Lined Nail Art Design by Simply Rins

Nail Art - Red Roses on Black

I RSVP'ed to an event earlier this week and the attire states Black and Red Cocktail. Now, most ladies I know would worry about what to wear. I, on the other hand, was worried on how I would wear my nails! *giggles* I knew that I only wanted red and black on my nails. I also wanted a nail design that would look classy and elegant. After a few ideas, I decided on roses. You can never go wrong with roses, right?

This was how it turned out:

Red Roses on Black Nail Art Design
Red Roses on Black Nail Art Design by Simpy Rins


I instinctively added leaves after painting the first rose but I changed my mind and erased it. I wanted to stick to the idea of just painting my nails in black and red.

Before I decided on the background color, I figured I needed to decide on my dress first. I seldom get to wear dresses since my work is at home. So whenever I get a chance, I like to feel like a girl and dress up. The evening cocktail party was perfect for my lil' red dress. Keeping that in mind, I figured a black base color would create a good contrast for the outfit.

Red Roses on Black Nail Art Design


I chose Orly Liquid Vinyl in 2 coats as my base color. Application was a bit tricky, especially for the first coating. But it finished great after the second.

I hand painted the roses using a detailing nail art brush and acrylic paints. Since I was working on a very dark background, I made sure my red color was bright enough to be seen.

Here's a photo of my nails with the cloth of my dress as background:

Red Roses on Black Nail Art Design


I think the black base color was a good complement for the color of the dress. However, it wasn't that attractive when I attended the event because it was held in a club wherein lights were at a minimum. I forgot to take that into account. But come to think of it, unless I was wearing glow in the dark or white polish, I don't think my nails would receive any sort of spotlight for the evening. But then again, the only person I needed to impress with my nail art was myself and I was really happy with them.

Red Roses on Black Nail Art Design


I painted only one rose per nail and added a few random red dots. Although, I think having only the roses would work too, making it look more formal.

Here's a glimpse of the venue, decorated with black and red balloons:

Red Roses on Black Nail Art Design


And here's the only decent picture I have of how I looked during the event:

Red Roses on Black Nail Art Design
cocktail dress by Kirei, bought a year ago at Landmark
black open toe strappy heels by Charles and Keith


My apologies for the background. I found a really big mirror inside the ladies room and since the lighting was better there, I figured it was my only chance to get a photo of my outfit and I'd really like to include one here with this nail art post.

Red Roses on Black Nail Art Design


I hope you didn't mind that there are more than the usual number of photos in this blog post. I couldn't resist not sharing all of them. I also hope you liked my Red Roses on Black nail art design. This would probably look lovely too for Valentine's. Well, it is still the month of love and I'll take this nail design as a way of making up to myself for wearing my nails bare on Valentine's day.

What do you think? Was I able to come up with something classy and elegant?

Nail Art: Pine Trees

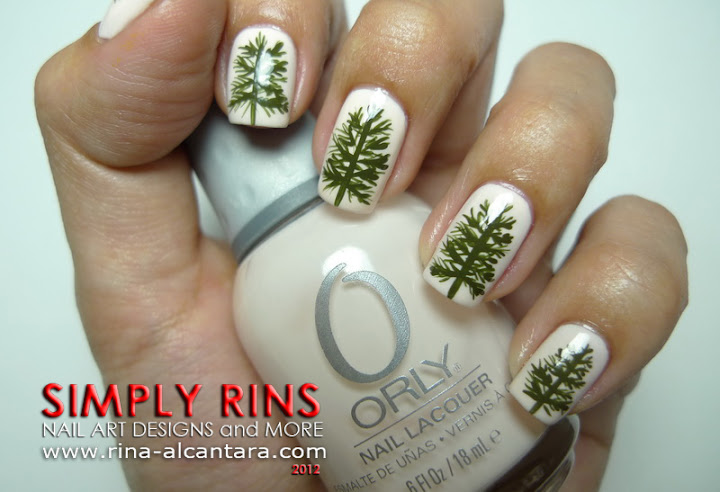
I spent last weekend with 3 amazing friends in Baguio, the City of Pines. The night before our road trip, I mustered the energy to do my nails. There were no choices. I instantly wanted to paint pine trees on my nails. I figured that it was the most appropriate nail design for our mini break up north.

Pine Trees Nail Art Design
Pine Trees Nail Art Design by Simply Rins


After several attempts on painting pine trees, I was almost about to give up. I couldn't come up with something that satisfied me. But being stubborn has its perks sometimes. I didn't want to go on this trip without pine trees on my nails. So I kept trying until I felt happy with the results.

Pine Trees Nail Art Design


I used Orly Kiss the Bride in 2 coats for this design. I was choosing between this very light pink shade or a light blue one. I hand painted the pine trees using acrylic paint and a mini striping nail art brush.

I believe that the base color helped made the pine trees pop out because it was almost white and I painted the pine trees using thin and thick strokes for texture.

Pine Trees Nail Art Design


It was a good thing I was working with acrylic paints because I made several attempts before I finalized the design that appealed to me. I didn't have to redo my manicure after every attempt. This is just one of the many advantages of working with acrylic paints for nail art. If you are interested, find more advantages here.

Here's a closer shot of the nail art:

Pine Trees Nail Art Design


During my initial attempts of painting pine trees, I used at least 2 colors because I was aiming for a little shading. I am seriously not good with that and I wanted to try. But somehow, the design always fall short of my expectations. So after a few more tries, I decided to stick with my personal style, clear colors and neat lines. On the other hand, I also wanted some texture. I came up with the idea of using different thickness on my strokes. I think it worked really well.

From creating this Pine Trees nail design, I've learned that you can get the effect of shading or add texture by using thin and thick lines.

Here are a few shots taken during our stay in Baguio City:

Pine Trees Nail Art Design
Pine trees nail art with actual pine trees on the background.


Pine Trees Nail Art Design
Holding actual pine tree leaves!


Pine Trees Nail Art Design
Another shot with pine trees as background.


Baguio has a very cold climate and to avoid dryness on my hands, I was constantly applying hand lotion. I see now in the pictures that my hands needed more moisturizing.

How will you rate my pine trees nail design and my attempt to add texture using various line thickness?


If you liked this nail design and would like to receive free updates whenever I post a new nail art, I am inviting you to subscribe here.

Nail Art: Brown Ombre and Dots

My first nail art for this year is an ombre. Gradient is a term I often use to refer to this kind of manicure but I was introduced to the term "ombre" that most nail art bloggers say in their posts. Honestly, I really don't know what it means. Thanks to ever dependable Google, I learned that it is a French word for shading.

I have been wanting to do something like this ever since I saw one but at the time, my nail polish stash is very limited in colors ... it is still until now, but has grown a little. When I finally decided to finally try one, brown was the first color that popped in my mind. So I looked for 5 nail lacquers that would create the look.

Here's my brown ombre manicure:

Brown Ombre and Dots Nail Art Design
Brown Ombre Nail Art Design by Simply Rins


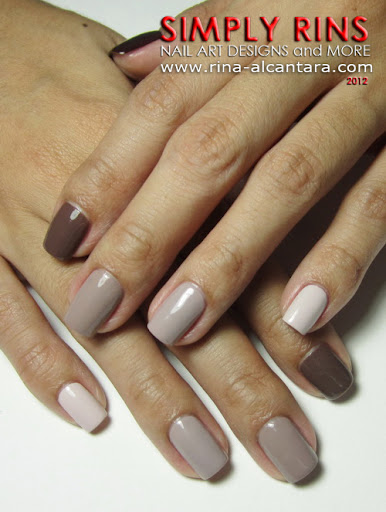
I polished the nail on my pinky with the lightest color and the darkest on my thumbnail. You can do it the other way around. It would really depend on your personal preference.

What I like about this nail art is its simplicity. I don't think it can get any simpler than this. If you know how to polish your own nails and you have the colors to work with, this is probably the simplest nail art ever! Also, if you're trying to get into nail art, I personally think this is a good start to be comfortable decorating your nails.

Brown Ombre and Dots Nail Art Design


Here are the polishes I used, in 2 coats each:
  • Pinky: Orly Pure Porcelain
  • Ring: Misa Pay Days Are Happy Days
  • Middle: Orly Country Club Khaki
  • Index: Essie Mink Muffs
  • Thumb: Faceshop BR802

Important things to remember when creating an ombre nail art:
  • Work with nail polishes that have the same finish or texture.
  • The lightest color is not necessarily white.
  • If you can create an ombre nail art with subtle transitions of shades, I think that would look absolutely amazing.

I really liked how my first ombre manicure turned out. I plan to do more soon, especially with my favorite color. :)

After a few days of wearing this, I decided to add a design. Since it is still January, I wanted to wear something with dots. From where I am, we have this belief that wearing polka dots to welcome a new year will bring good luck and wealth. This is also the reason why we fill our pockets with coins too during the new year. Unfortunately, I do not own a single polka dot inspired piece of clothing. How sad is that? But it is never too late for anything, right? So I decided to add random dots on my ombre nails.

Brown Ombre and Dots Nail Art Design


I used white, yellow, and pink nail polishes to create the dots in different sizes. I have mixed feelings with the outcome but I did love the color combination. I'm not sure if I should have used darker shades of colors for the dots.

What do you think?


P.S. My camera is with my sister for the weekend when I did this nail art. Thanks to nanay who lent me her digicam until I got mine back.

Nail Art Tutorial: Fireworks

Another year is about to end. In a few days, a new year is upon us and we are given another chance to do things better. A lot of good things happened to me and this blog that I am thankful for. That deserves a separate blog post. For the meantime, I'd like to share with you a simple new year nail art design. I painted fireworks!

Fireworks Nail Art Design
Fireworks Nail Art Design by Simply Rins


I chose Orly Goth in 2 coats as background color. The fireworks were painted using various colors of acrylic paints and a short striping nail art brush.

I also chose to paint different colors of fireworks in random places on all my nails. Another option is to have just one color for all the fireworks. But I guess fireworks is really a color display, so a lot of colors is in order.

Fireworks Nail Art Design


My mom said that the design looks like a flower. Looking at it, I think she's right. But perhaps it can be both since fireworks do look like flowers without a center. I'm still happy with how this came out. It looks festive and the colors will fit perfectly for the celebration. When I look down on my nails, I can imagine mini firework displays. :)

Fireworks Nail Art Design


The design appears complicated but it is relatively easy to do. Here's a video nail art tutorial that I prepared for this fireworks nail art design:


Thank you for watching! If you found this interesting, you may to subscribe to my YouTube channel or subscribe to my feeds so that you will not miss any updates from me.

Nail Art Tutorial: Reindeer

After creating a Santa's Elves Nail Art, I thought of paying tribute to other "magical creatures" that help Santa Claus deliver all those wonderful presents during Christmas. I decided to come up with a reindeer nail art design!

This is a freehand Christmas nail art design that features reindeer!

Reindeer Nail Art Design
Reindeer Nail Art Design by Simply Rins


I wanted to just create an accent nail at first. I thought of just painting Rudolph (the red-nosed reindeer) and paint some abstract design on the other nails. Not a bad idea, actually. But as I was polishing my nails, I think I went crazy because I decided to paint reindeer on all my nails!

Lesson learned: As I was typing the word "reindeer" with an s, the crooked red line keeps appearing underneath the word. So I looked up the plural of reindeer and learned that it is its singular and plural form!

All reindeer were painted using acrylic paint and a detailing nail art brush.

Reindeer Nail Art Design


I used Orly Pure Porcelain in 2 coats as base color. White would have been my usual choice but I figured the slight pinkish shade of Pure Porcelain would give this reindeer nail art a more dainty feel. I think it did a good job.

Reindeer Nail Art Design


We know that Santa Claus has 8 flying reindeer that pulls his sleigh on Christmas eve. They are named Dasher, Dancer, Prancer, Vixen, Comet, Cupid, Donder and Blitzen. These reindeer were popularized by a poem entitled "A Visit from St. Nicholas" or more popularly known as "Twas the Night Before Christmas". It was written by Clement Clarke Moore in 1822.

Take a look at the 8 reindeer I painted:

Reindeer Nail Art Design
I just have to take a group shot!


By 1939, another reindeer was introduced to us by Robert L. May -- Rudolph the red-nosed reindeer! He was a copywriter working for Montgomery Ward department stores. The company asked him to create a new Christmas story that they could present to their shoppers as giveaways. Two years after, Robert's brother-in-law, Johnny Marks, came up with the "Rudolph the Red-Nosed Reindeer" song. Since then, Rudolph has become the most famous reindeer of Santa Claus that guides the other 8 reindeer with his shiny red nose.

I decided to paint Rudolph on my left thumbnail.

Reindeer Nail Art Design
Rudolph and his date!


After painting Santa's 9 magical reindeer, I had a little problem of what to paint on my right thumbnail. I was seriously thinking of Santa Claus. But I still didn't want to paint him til December comes. So after tweaking a few more ideas, I decided to give Rudolph a date by drawing a female reindeer!

For the girl reindeer, I added a little red ribbon on her head.

This Christmas nail design has become one of my personal favorites. It brings a smile to my face whenever I look at them. Do you experience that sometimes on your nail designs? And so when I visited Don this week, I asked him to take some photos of my reindeer nail art. He is a brilliant photographer!

Reindeer Nail Art Design
Photo in natural light, courtesy of Don


Reindeer Nail Art Design
Photo in natural light, courtesy of Don


This is fairly an easy design to recreate. You may want to consider trying this design even if you are a nail art beginner. The shapes and lines that makes the reindeer are simple, even with your non-dominant hand.

Here's a nail art tutorial I prepared:


Thank you for watching! If you enjoyed the tutorial, please subscribe to my YouTube channel.

Did you find this Christmas nail design magical?

Nail Art: Christmas Garlands

I'm starting Christmas early here at Simply Rins by sharing with you my first Christmas nail art idea for this year. I decided to come up with something simple and festive. I recommend this for nail art beginners. It is relatively easy to do, even when you're working with your non-dominant hand.

My inspiration for this Christmas nail design is a popular decor for the season -- garlands!

Christmas Garlands Nail Art Design
Christmas Garlands Nail Art Designs by Simply Rins


For the base color, I used 1 coat of Orly Kiss The Bride and layered it with 2 coats of China Glaze Cloud Nine. I love this shimmer nail polish. It gives a subtle gold glitter that I think is perfect for the holidays.

Christmas Garlands Nail Art Design
left hand


I decided to paint the garlands differently on each hand. Red garlands for my left hand and green on my right. I used Color Club Ruby Slippers on my left hand and Orly Meet Me Under The Mistletoe on my other hand.

For a more garland effect, I used a dotting tool and used a dabbing technique to paint garlands on my nails. The lines that would serve as garlands is prettier with irregular edges.

Christmas Garlands Nail Art Design
right hand


I randomly placed gold micro beads for further details. These beads are almost always bleeders once you put a top coat over them. To make sure the bleed wouldn't be as evident, I was careful to place the micro beads inside the red and green glitter polishes that I used for the garlands.

Christmas Garlands Nail Art Design


You may opt to use more colors of the beads for a more festive look. As for me, I decided to just use one color -- gold, for this Christmas nail art design. Overall, I was satisfied with how this turned out. I found it interesting and classy. What do you think?

Nail Art: Brown For A Wedding

My father was godfather to a newly wed this weekend and my mother and I accompanied him. The wedding took place out of the city and that meant a long drive. I enjoy long drives. So when my parents asked me to tag along, I agreed. But the unexpected traffic going home ruined the drive for me though.

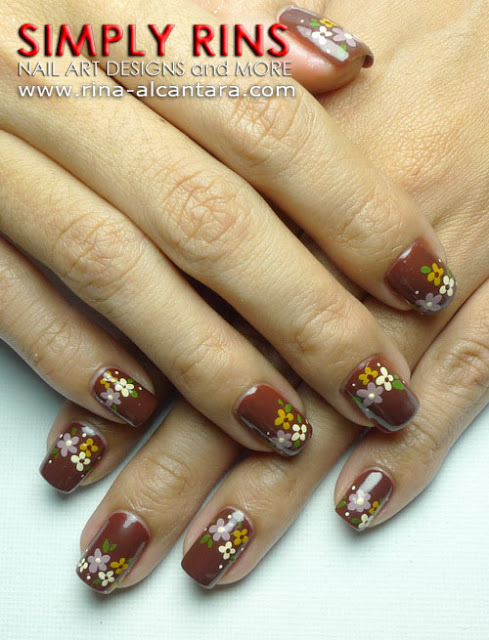
Anyway, I scanned my closet the night before the wedding to look for a dress. I decided to wear this brown floral dress and I wanted to create a wedding nail design that would go with it. I was aiming for something simple and dainty and this is what I came up with:

Nail Art Brown For A Wedding
Brown For A Wedding Nail Art Design by Simply Rins


Brown base color is 2 coats of Orly Hot Chocolate. I remember using this on my Nail Art: Dots On Dots. I absolutely love this brown color and application is a breeze. The bottle color is much lighter compared to when its applied to nails. It becomes a deep brown after 2 layers.

The flowers were all hand painted using acrylic paint and a detailing nail art brush.

I requested nanay (Filipino word for mother) to take a full body photo of me so I could share with you how I came up with my nail design for the wedding. Here it is:

Nail Art Brown For A Wedding
Floral Dress: Dorothy Perkins
Wedge Shoes: Aerosoles
Nail Art: by ME!
Photographer: my mother


Please forgive the lack of artistry. I really am clueless when it comes to posing for the camera. Perhaps I can do this on a regular basis, matching a nail design for an outfit just because I had fun and I think it is a great personal challenge.

The color of the dress is sort of golden brown. I originally wanted to match that color with a nail polish, but unfortunately, I don't have one that matches that shade. I was torn between something yellow or beige as base color for my nails until I decided for a deep brown that would match my shoes.

Nail Art Brown For A Wedding


The idea is to come up with a nail design that would complement the outfit, and not just the dress. And since I am not really into accessories, I decided to use the colors on the look to create a nail art that would tie everything together.

Personally, I think the chocolate color of the nail polish created continuity from top to bottom. It is a subtle contrast to the dress color. Further, I also painted the small flowers using the hues of the dress for coherence.

Nail Art Brown For A Wedding
Photo was taken inside the Church.


In all my nail art designs, I have always strive to achieve clear lines. It has become a personal style. Mainly because I think they look neater that way. I find that it is easier to look at nail designs like that. The reason I'm saying this is because at first, I wanted to paint the floral pattern on my dress into my nails. But that would mean I have to divert to my style. I chose not to because I think it is good to have a personal style. It is sort of your watermark.

Nail Art Brown For A Wedding


I alternated the placement of the flowers in each nail. I chose to paint the tiny flowers near the free edge and near the cuticle area. It makes it more interesting that way. If you are more into consistency, you may choose either. I would probably choose painting the flowers near the cuticle area if I had to choose only one place on my nails.

How do you feel about this matching nail art?

Nail Art: Halloween Polka

I can't believe October is almost over ... and so is my mini project to create Halloween nail designs for the entire month. This would probably be my last Halloween inspired nail art for the year. But I'll try to squeeze in another one if I have time before Halloween day itself. :)

If you want something simple and chic for Halloween, I think this might be a perfect idea. It is easy to do and it looks like full nail art stickers too!

Halloween Polka Nail Art Design
Halloween Polka Nail Art Design by Simply Rins


Base color is 2 coats of Orly Liquid Vinyl. I am not so fond of this black polish. I make more effort to apply a decent coat. Or perhaps I purchased a bad bottle?

This Halloween nail design is a play of colors. I used black, orange, and yellow. Dashing Diva Tangie Tangerine Thalia for the orange and OPI The "It" Color for the yellow. Also, I only used a dotting tool for this nail art!

Halloween Polka Nail Art Design


To recreate this Halloween polka dots design, alternate 2 colors when dabbing dots into your nails. I suggest doing a polka dot design with one color first instead of immediately alternating colors. Just make sure you space the dots appropriately to accommodate the 2nd color. I also recommend creating smaller dots as they are easier to work with, especially when you reach the edges of the nails.

Halloween Polka Nail Art Design


I find this Halloween nail art design simple, attractive, and classy all at the same time. It is quite easy to do too! What do you think?

Nail Art: Pumpkin Silhouettes

October is ending in less than 2 weeks and I still have a few more Halloween nail art ideas I'd like to share with you. This is the 6th installment to my Halloween nail designs series. I wanted to create a pumpkin inspired design but I wanted something different. I wanted pumpkins that were not orange and I wanted colors! So after tweaking a few ideas, I decided to create pumpkin silhouettes.

This is a freehand nail art and another colorful design for Halloween.

Silhouette Pumpkins Nail Art Design
Pumpkin Silhouettes Nail Art Design by Simply Rins


Base colors in 2 coats each:
  • Thumb: China Glaze For Audrey
  • Index: OPI Tazmanian Devil Made Me Do It
  • Middle: OPI The "It" Color
  • Ring: Color Club Pucci-licious
  • Pinky: Orly Ancient Jade

I used the same polishes for the eyes and mouth and painted everything else with black acrylic. I recommend choosing bright colors for the silhouette pumpkins to show. As an alternative, you may also choose only one color for your base color.

Silhouette Pumpkins Nail Art Design


At first, I only did the pumpkins on the nail tips but while I was painting the design, I had an idea of framing the entire nail. I have never done that ever since I started nail painting and figured it would look good with this design. Outlining the edges of the nails makes it look slender, don't you think so?

Silhouette Pumpkins Nail Art Design


I am in the middle of a few projects right now that is keeping me quite busy right now. But I promise to upload a tutorial for this before Halloween comes.

I personally love this pumpkin inspired Halloween nail art design. They're colorful, different, and fun! What do you think?

Nail Art: Colorful Skulls

It's October and it's time to create those spooky ... yet fun Halloween nail art designs! I'd like to start with a design that is a little out of the box in terms of color. Halloween is often associated with colors such as black, white, orange, and yellow. My first hand painted Halloween nail art for this year is not of its traditional colors and I decided to paint skulls and gave it a twist by adding eye details. I found this both spooky and amusing.

Halloween Colorful Skulls Nail Art Design
Colorful Skulls Nail Art Design by Simply Rins


Base colors in 2 coats each:
  • Thumb: Orly Cupcake
  • Index: Color Club Take Me To Your Chateau
  • Middle: OPI The "It" Color
  • Ring: OPI Do You Lilac It
  • Pinky: Orly Green Apple

I selected colors that is light enough for black to standout because I intended to freehand the skull details with black acrylic paint.

Halloween Colorful Skulls Nail Art Design


These skulls are easy to paint since the shapes need not be exactly the same. For example, the eyes need not be a perfect oval in shape. As for the nose, I just dabbed 2 small vertical lines in the middle. The mouth is a simple horizontal line with a few short vertical lines.

I added a twist to the eyes by dotting small white dots. I created a few different expressions using these white dots. Some of my skulls are looking up or down, some looks dizzy and others look crazy. The added details made this Halloween nail art design something interesting or fun to look at. It is also unconventional because of the colors.

Halloween Colorful Skulls Nail Art Design


Another option is to paint my nails with 10 different colors. But I decided to wear both hands with the same set of colors. If you are in the mood, this is probably a better idea!

I'll be coming up with more hand painted/freehand Halloween nail designs for the whole month of October. So don't forget to subscribe and get updates to new Halloween nail art ideas.

How did you find this nail design?

Nail Art: Angry Birds ... Again

A few days ago, I was interviewed for a nail art feature on one of the country's top television networks. It was 2 days after I came home from an out of town trip. They requested a demo for the Angry Birds nail art design I did last January. But due to a fever and unforeseen circumstances, I wasn't able to do the requested demo on my nails.

When I recovered, I decided to recreate my Angry Birds nail design and I hope this post serves as an apology to the understanding and patient people of this television network.

Angry Birds Nail Art Design
Angry Birds Nail Art Design by Simply Rins


You see, I went down with a bad fever the night before the shoot. It was scheduled before lunch. I woke up really early that day and struggled to do my nails. I wanted to reschedule but I knew I would be creating a huge hassle on the organizers.

After taking a quick shower, I realized I ruined most of my nails. Naturally, I didn't want a national television show capturing my nails looking unsatisfactory. I have always challenged myself to always come up with neat designs. This will NOT be an exemption. And so, I removed everything and started all over.

Simply Rins
This is me doing some nail designs on a lovely model for the feature.


By the time the TV crew came, my nails were hardly ready. Luckily, they brought with them a model to whom I can demonstrate my nail designs to. It would be less time consuming that way since I find it harder to paint nail designs on my own nails compared to if I will be doing it to another.

I was shaking a little as I wasn't used to being filmed while working. I was asked to create 5 different Halloween nail designs on one hand and 5 different Christmas nail art on the other hand. I included some of my favorite designs.

Angry Birds Nail Art Design


Anyway, onto the nails! This is my second attempt to create an Angry Birds nail art design. The most distinctive difference are the outlines that I added to make the birds ... and the pigs more prominent. Also, I used nail polishes for painting the first one while I used acrylic paints on the latter.

Angry Birds Nail Art Design
It's a coincidence how the nasty pigs are all on one side
and the birds on the other.


Base color is 2 coats of Orly Pure Porcelain.

I freehand painted more pigs this time and eliminated the slingshot. I figured it would look more interesting to have more of those green pigs visible. Otherwise, our angry birds would not be able to have enough pigs to vent out their anger.

Angry Birds Nail Art Design


How did you like this second attempt of Angry Birds nail art compared to the previous one? I had most fun painting the pigs.

I deliberately didn't include more details regarding the television feature of my nail art as I still need to receive information on the schedule of its airing. I will surely let all of you know when I get more details. For the meantime, I'd like to say thank you to all of you who keeps supporting my nail designs and to my family whose always behind my every endeavor.