Showing posts with label Halloween. Show all posts

Nail Art: Peeping Black Cat

The final installment to my Halloween 2014 nail art series is somewhat personal ... again. As you have read in my previous posts, I am a recent furparent to a sweet cat named Floozie and her 4 adorable furbabies. So yes, this is another cat inspired Halloween nail art design. But this time, I would like to advocate the safety of cats, particularly black cats during this season of superstitious beliefs.

We all know that black cats is associated with bad luck and during Halloween there are (heartless) people who find it amusing to hunt and hurt cats. Experiencing first hand how wonderful cats are, I would like to contribute to the campaign through this nail art post and hopefully help spread the word to help safeguard cats during this superstitious time by keeping them indoors or simply by spreading the word.

Here's the nail art:

Peeping Black Cat Nail Art Design by Simply Rins

Nail Art: The Return of Black Cats Galore

I was suppose to post this the other day, but a project came and had to put it on hold. It's my 6th Halloween nail art design for this year. This is a recreation I have been meaning to do that somehow didn't push through until this week.

Do you still remember Black Cats Galore Nail Art from my 2012 Halloween series? Well, this was also inspired by black cats with minor details added. I've only used cats as inspiration during Halloween. It has been (and still is) one of my nail designs often shared, recreated, and infringed. And this year, these cats inspired nail art became more personal. I simply cannot let the year pass without a recreation. More on this later. Let's take a look at the results first:

The Return of Black Cats Galore Nail Art Design by Simply Rins

Nail Art Tutorial: Skulls and Bones

I simply love how this Halloween nail art turned out. It looks complicated at a glance, but is absolutely easy to do. And I am happy to say that this is the 5th design for my 2014 Halloween series.

As the title suggests, this nail art was inspired by skulls and bones. I've done skulls for 2 straight years. Skull Skittles last year which was actually just a recreation of Colorful Skulls. But what I am about to share here is different and I hope you'll like it as much as I do. I feel a little weird though because I had mixed feelings with my previous bats nail art and all of sudden I feel thrilled about this!

Here it is:

Skulls and Bones Nail Art Design by Simply Rins

Nail Art: Bats

Bats is the inspiration for the 4th installment of my 2014 Halloween nail art series. I have mixed feelings about this nail art and so I think this post will be short and quick with only a few pictures. I don't know how to put in words how I feel about the results. But it seems like it lacks something to be interesting enough.

Take a look:

Nail Art: Graveyard, Too

It has been a week since my last nail art post and it was completely unintentional. I had a serious cut on my left index finger and it was rather painful when pressured is applied. I couldn't even apply nail polish properly. My bad. But I am back and I am very excited to share with you the 3rd installment to my 2014 Halloween nail art series!

I am particularly proud of this one because it took me a longer time than usual to be able to do this. I called it "Graveyard, Too" just because I already made a nail design of the same theme last year that I simply named, Graveyard. I did it a little different this time.

Check it out:

Graveyard, Too Nail Art Design by Simply Rins

Nail Art Tutorial: Cobwebs

This is the first instance I'd be sharing a freehand cobweb nail art for Halloween. I wanted a more realistic feel of spider webs every time I include them on my designs, but failed miserably without using stamping plates. I gave it another try for this year's 2014 Halloween series and I really love how it turned out.

Take a look:

Cobwebs Nail Art Design by Simply Rins

Nail Art Tutorial: Itsy Bitsy and Hairy Spiders

This is the first for my Halloween nail art design series of 2014. If you are a new subscriber, every year I come up with a series of freehand nail art in time for Halloween. I also do this for Valentine's and Christmas. But I missed the last season of hearts. So to make up for it, I'm starting the Halloween series a little early this year. It is actually a yearly challenge that I quite enjoy.

Let's kickoff the Halloween nail designs here at Simply Rins with a video nail art tutorial. But first, take a look at what I came up with:

Itsy Bitsy and Hairy Spiders Nail Art Design by Simply Rins

Nail Art: Mummy Remake

2013 is a slow year for Simply Rins. I usually allot the entire month of October to share Halloween inspired nail art designs. But this year came differently. But I can't let 2013 slip by without at least a Halloween nail art so ladies, here it is!

I have done a mummy nail art and decided to do a remake for a week long adventure I had with friends. Island hopping was in the itinerary and I initially wanted a beach inspired nails but since it is Halloween season, might as well wear Mummy nails!

Mummy Remake Nail Art Design

I did this freehand nail design the night before our flight and I wasn't able to take photos as how I normally do. The pictures here were all taken during our vacation.

Mummy Remake Nail Art Design

Base color is one coat of Dazzle Dry Midnight Express. I think a rich brown color for background would also work for this nail art. I used a detailing nail art brush and acrylic paints for the design.

I mixed white and tan for the color of the bandages. To get that antique look, I watered down white paint and brushed a few strokes on the bandages. This extra detail actually makes a difference.

Mummy Remake Nail Art Design

I would have made a mummy on all my nails if I had more time. But wearing 2 mummies, 1 on each hand was enough to accompany me on my vacation.

Did you notice the teeth on my mummies? Well, it's one of the things I did differently for this remake aside from how I painted the bandages. It would have been easier to use a flesh base color and just paint black lines to create the effect of bandages. So why did I paint this differently? Well, I wanted some texture so I really packed up on the acrylic paint. Even if you'll use a self-leveling top coat, the texture will still be there. ;)

Mummy Remake Nail Art Design

One good thing about this design is that chip offs from wear is welcoming and makes the mummy and the bandages look more authentic. I've been wearing this nail art for more than a week now and it still look good aside from the visible growth near the cuticle area.

I didn't get to experience Trick or Trick this year but my mummies were able to go island hopping, enjoyed 2 waterfalls, and met new friends!

How about you? How did you wear your nails for Halloween?


Nail Art: Not So Spooky Ghosts

I was driving around tonight while trying to decide where to eat when I received a text message from a friend asking why I haven't posted a Halloween nail design I wore during her birthday celebration. Well, one reason was that I was away last weekend and partly because my Skulls Skittles surprised me with many of you appreciating it so I decided to let it stay on top for awhile.

But I couldn't disappoint a friend and her request to see this here already. So, without further ado, here's my 5th installment to this year's Halloween nail art ideas. I named this Not So Spooky Ghosts.

Not So Spooky Ghosts Nail Art Design
Not So Spooky Ghosts Nail Art Design by Simply Rins

Nail Art: Skulls Skittles

My next Halloween inspired nail design is definitely not spooky but the concept should have been one. This is actually a remake from last year's Colorful Skulls Nail Art. The difference lies on how the skulls were painted. I retained the idea of a skittle's manicure so I named this "Skulls Skittles".

Take a look:

Skulls Skittles Nail Art Design
Skulls Skittles Nail Art Design by Simply Rins

Nail Art: Blood Spill

This is the 3rd installment to this year's Halloween nail art designs. It has been a tradition here in Simply Rins that I dedicate the month of October to coming up with interesting Halloween nail art ideas. What I'd like to share with you now involves my favorite color -- red.

I simply called this design, "Blood Spill" because it looks like it. Well, at least that is what I wanted it to look like. A lot of nail artists have done this design and I wanted to do it the non-traditional way and hoped that it would give the same effect. I'll let you be the judge of that.

Here's the result:

Blood Spill Halloween Nail Art Design
Blood Spill Halloween Nail Art by Simply Rins

Nail Art: Graveyard

This second installment of Halloween nail art design is an attempt to create something spooky. I am not particularly fond of scary things because I am easily frightened. But I decided to paint a graveyard scene on my nails to achieve that spookiness. I suppose I can handle something like this on my nails.

I was skeptical while I was painting this design since I am not a fan of cemeteries. Surprisingly, I really liked the results. Take a look:

Graveyard Nail Art Design
Graveyard Nail Art Design by Simply Rins

Nail Art: Black Cats Galore

It has been a tradition here in Simply Rins that I feature Halloween nail art ideas every October. Here's the first installment for 2012 to start the ball rolling.

My intention for this one is to come up with something attractive and crazy. Let me get to that in detail after I show you the nail art design that I named Black Cats Galore.

Black Cats Galore Nail Art Design for Halloween
Black Cats Galore Nail Art Design by Simply Rins

Nail Art: Halloween Polka

I can't believe October is almost over ... and so is my mini project to create Halloween nail designs for the entire month. This would probably be my last Halloween inspired nail art for the year. But I'll try to squeeze in another one if I have time before Halloween day itself. :)

If you want something simple and chic for Halloween, I think this might be a perfect idea. It is easy to do and it looks like full nail art stickers too!

Halloween Polka Nail Art Design
Halloween Polka Nail Art Design by Simply Rins


Base color is 2 coats of Orly Liquid Vinyl. I am not so fond of this black polish. I make more effort to apply a decent coat. Or perhaps I purchased a bad bottle?

This Halloween nail design is a play of colors. I used black, orange, and yellow. Dashing Diva Tangie Tangerine Thalia for the orange and OPI The "It" Color for the yellow. Also, I only used a dotting tool for this nail art!

Halloween Polka Nail Art Design


To recreate this Halloween polka dots design, alternate 2 colors when dabbing dots into your nails. I suggest doing a polka dot design with one color first instead of immediately alternating colors. Just make sure you space the dots appropriately to accommodate the 2nd color. I also recommend creating smaller dots as they are easier to work with, especially when you reach the edges of the nails.

Halloween Polka Nail Art Design


I find this Halloween nail art design simple, attractive, and classy all at the same time. It is quite easy to do too! What do you think?

Nail Art: Halloween Cupcake

October is on its last week and Halloween is almost upon us! Have you decided how you will wear your nails for the event? Perhaps this 7th installment for my Halloween nail art ideas series can inspire you. As you may already know, I am very fond of my cupcake nail design that I've recreated it to match several occasions. This is another cupcake design, this time, for Halloween. Instead of adding cherries on top, I added little pumpkins!

Halloween Cupcake Nail Art Design
Halloween Cupcake Nail Art Design by Simply Rins


Base color is just a base coat. I used 3 coats of China Glaze Orange Knockout (Neon) for the cupcake holder, painted on the nail tips. For the cupcake itself, I used Lucidarling white shimmer nail polish. For the stems, I used China Glaze Tree Hugger.

All other details were painted using black acrylic.

Halloween Cupcake Nail Art Design


This Halloween cupcake is a simple freehand nail art design. I didn't add the usual sprinkles because I wanted the pumpkins to standout. I also painted a smiley face on the small pumpkin toppings just to make the design more interesting.

Halloween Cupcake Nail Art Design


Tutorials for the previous Halloween designs will be posted soon. My apologies for the delay. I just came back from a mini break with my mother and sister. For the meantime, I hope you find this Halloween nail art design inspiring. I wore this during our short vacation and I was really fond of them.

What do you think of this design?

Nail Art: Pumpkin Silhouettes

October is ending in less than 2 weeks and I still have a few more Halloween nail art ideas I'd like to share with you. This is the 6th installment to my Halloween nail designs series. I wanted to create a pumpkin inspired design but I wanted something different. I wanted pumpkins that were not orange and I wanted colors! So after tweaking a few ideas, I decided to create pumpkin silhouettes.

This is a freehand nail art and another colorful design for Halloween.

Silhouette Pumpkins Nail Art Design
Pumpkin Silhouettes Nail Art Design by Simply Rins


Base colors in 2 coats each:
  • Thumb: China Glaze For Audrey
  • Index: OPI Tazmanian Devil Made Me Do It
  • Middle: OPI The "It" Color
  • Ring: Color Club Pucci-licious
  • Pinky: Orly Ancient Jade

I used the same polishes for the eyes and mouth and painted everything else with black acrylic. I recommend choosing bright colors for the silhouette pumpkins to show. As an alternative, you may also choose only one color for your base color.

Silhouette Pumpkins Nail Art Design


At first, I only did the pumpkins on the nail tips but while I was painting the design, I had an idea of framing the entire nail. I have never done that ever since I started nail painting and figured it would look good with this design. Outlining the edges of the nails makes it look slender, don't you think so?

Silhouette Pumpkins Nail Art Design


I am in the middle of a few projects right now that is keeping me quite busy right now. But I promise to upload a tutorial for this before Halloween comes.

I personally love this pumpkin inspired Halloween nail art design. They're colorful, different, and fun! What do you think?

Nail Art: Spider Tips

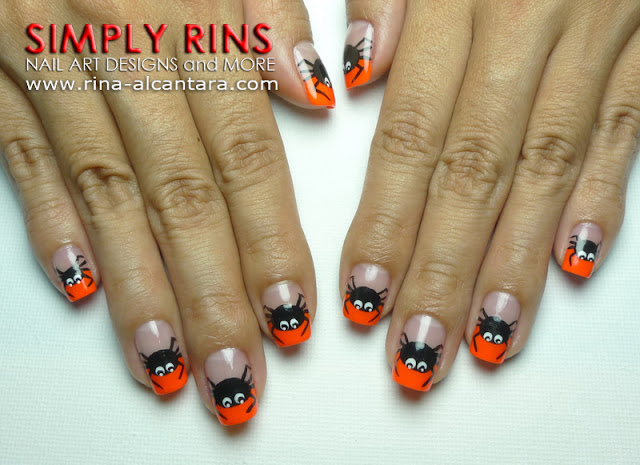
I found a neon orange nail polish in my stash that I was looking for another orange nail lacquer aside from the one that I used on the Haunted House and Black Cats nail art. I dared myself to wear it but I couldn't apply it on my entire nail. So I figured I could make a design that would allow me to wear this neon polish only on my nail tips! And so for my 5th Halloween nail art series for this year, I hand painted spiders on the tips of all my nails!

Spider Tips Nail Art Design
Spider Tips Nail Art Design by Simply Rins


Nail tip color is China Glaze Orange Knockout (Neon) in 2 coats. It dries matte but is shiny in this nail design because of the top coat. No base color except for a layer of my favorite base coat.

I used black acrylic paint for the spider using detailing nail art brush. I suggest using a stripping brush for the legs. It is easier to create lines with such brush. Also, I painted the eyes using a dotting tool.

Spider Tips Nail Art Design


This is a freehand nail design that I think is suitable for nail art beginners. I have received requests for Halloween nail designs for beginners and I think this Spider Tips is applicable. If you can manage to paint an oval and lines, then you may find this nail design easy to recreate.

Spider Tips Nail Art Design


The spiders in this Halloween nail design is far from being spooky. I am still for cuteness for Halloween. I am easily scared and I would hate to wake up in the morning and have to look at spooky nails! Or perhaps it can be spooky and cute at the same time? They are black spiders in the first place, right?

Spider Tips Nail Art Design


The neon color looks great during the day. It attracted a lot of attention but since they were only painted on the nail tips, it was subtle enough to be wearable (for me, at least). I still have to wait for the day I could wear neon on full nails. Perhaps I could try on the actual day of Halloween.

I still have a few more Halloween nail art ideas to share with you for the remaining half of October. Be updated and join me on Facebook.

How do you feel about this Halloween Spider Tips nail art design? :)

Nail Art: Cute Dracula

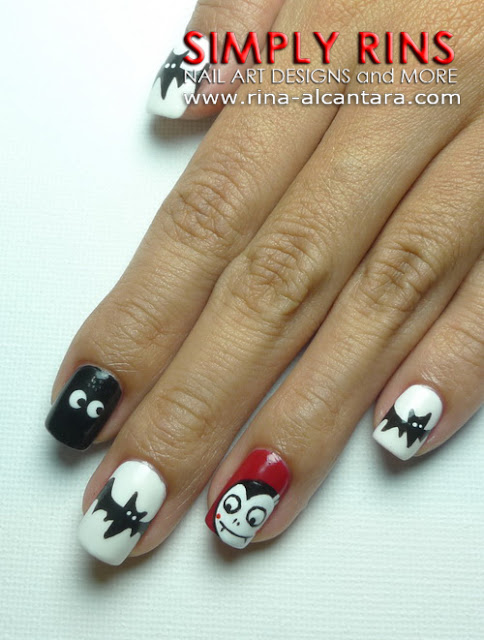
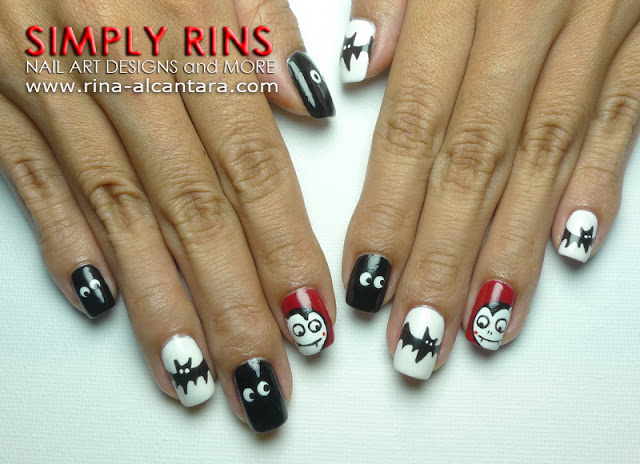
Earlier this month, I asked you on Facebook for requests on Halloween nail art ideas. I did the girly skulls first that I named Colorful Skulls. There was a request for cute vampires and I did just that for my 4th installment of Halloween nail art designs for 2011. This is a freehand nail art that features a very specific vampire -- Dracula.

The design includes Count Dracula, one on each hand, bats and spooky eyes.

Cute Dracula Nail Art Design
Cute Dracula Nail Art Design by Simply Rins (left hand)


Base colors are:
  • Red - Sally Hansen Cherry Red in 2 coats, applied as background color for Dracula.
  • Black - Sally Hansen Black Out in 2 coats, applied as background color for spooky eyes.
  • White - Color Club Paris White in 3 coats, used as base color for the bats.

I used acrylic paints, a detailing nail art brush, and dotting tools for this vampire nail art.

Cute Dracula Nail Art Design
Cute Dracula Nail Art Design by Simply Rins (right hand)


Since I'll be working on with my weaker hand to paint my right, I decided to have more spooky eyes on my right hand instead of mimicking my left hand to make it easier for me. I think it makes the entire design more interesting this way despite my lame excuse. :)

To make a cute Dracula, I decided to paint a round face for him and add red blushes on his cheek. I also added 2 white stripes on his hair as how is normally depicted. For a scary vampire, you could make his eyes red. I painted the eyes quite normally for a cartoonish look.

Cute Dracula Nail Art Design


For the bats, I drew them as silhouettes with white eyes. I intentionally wanted the bats to cut across my nails so I painted them with the wings stretched up to the edge on both sides of the nail. Looking at it after I was done sealing my design, the bats would have been a good idea for a french tip inspired design for Halloween.

As for the googly eyes, I just wanted to add more cuteness to the design. Do you think it worked?

Cute Dracula Nail Art Design


I'll be trying to squeeze in more requests before the month ends. If you have ideas that you would like me to create, you can contact me here.

I hope you enjoyed my Cute Dracula Halloween nail art! Does my vampire deserve to be labeled cute?

Nail Art: Four Frankensteins

For my 3rd Halloween nail art design installment for this year, I decided to recreate Halloween's green monster. As the title suggests, I painted four Frankensteins for this nail design, 2 on each hand. If I had more time, I would have painted him on all my nails. That would have been more fun!

This is a freehand nail design. I have been asked several times if the nail art I post here are my creations or, are they nail stickers. I have disclosed that yes, I paint my own nails and create these nail designs personally. I am in the process of publishing a FAQ (Frequently Asked Questions) page to serve as reference to future inquiries.

Four Frankenstein Nail Art Design
Four Frankensteins Nail Art Design by Simply Rins


Base colors are 2 coats of China Glaze Tree Hugger for the green, and Color Club Paris White for the accent nails. I also used Tree Hugger for Frankenstein's face for consistency.

For the other details of the design, I used black acrylic paint, a detailing and stripper nail art brush.

I am personally not so fond of wearing green. I only have a few shades on my stash and I bought them mostly for nail art purposes. Aside from Zoya Shawn, I am surprised to have like Tree Hugger.

Four Frankenstein Nail Art Design


I made 4 accent nails for this Halloween nail art design. On my left hand, Frankenstein can be seen on my ring and index finger. He's on my pinky and middle finger on my right hand. I painted stitches on all the other nails. If you have the time, you could probably paint all your nails with Frankenstein and create different facial expressions.

Four Frankenstein Nail Art Design


Out of personal preference, each Frankenstein is facing another Frankenstein, sort of like a mirror image. I also painted him in 3/4 perspective, an effect that you can simple create by making one eye smaller than the other. I wanted a little white to show just to break the monotony of the green.

I did a Frankenstein Halloween nail art last year that you can view here. I was new at freehand nail painting then and decided to take it slow by starting with simple shapes that is easy for my weaker hand to do. It has been a year since then and I want to believe that my skills have improved.

Four Frankenstein Nail Art Design


To fellow nail art enthusiasts who are starting to explore freehand nail art, I know that there will be times of frustrations, but with a little practice, you'll eventually develop the skill.

I'd like to take this opportunity to thank those who have sent me messages via the contact form. I am happy to help you in any way I can.

Tutorial will be posted soon! Subscribe here so you won't miss a thing!

What do you think of this Frankenstein Halloween nail art design?

Nail Art: Haunted House and Black Cats

This is my 2nd hand painted Halloween nail art design for 2011 and I'm excited to do more for the whole month of October. I'll try my best to squeeze in all requests in time for Halloween.

After having fun with the Colorful Skulls Nail Art, I decided to create something out of the usual Halloween colors -- black and orange. This nail art is also a combination of 2 Halloween fixtures, the haunted house and black cats.

Haunted House and Black Cats Nail Art Design
Haunted House and Black Cats Nail Art Design by Simply Rins


Base color is 2 coats of OPI Chop Sticking To My Story. It's a dark orange shade. I wanted a basic orange as background but unfortunately, I don't have one in my stash. Boo! I'll be scouting for one on my next shopping day.

Everything else were painted using acrylic paints.

Haunted House and Black Cats Nail Art Design


I decided to paint a haunted house on each of my ring finger to serve as accent nail. Actually, I wanted to attempt a design with a full moon as backdrop and I thought that a haunted house or a black cat would look great on the foreground. I decided to paint a spooky house with the moon for the accent nails and have black cats on all the other nails. This would give a twist to the overall Halloween nail art design.

Haunted House and Black Cats Nail Art Design


I'm not quite sure that the base color complements my skin tone but I do love how this nail art turned out. The black cats didn't look that scary but I liked how their eyes were the only details that was needed to make it a little spooky for the theme.

I think my haunted houses need improvement but I really did enjoy painting the accent nails. The full moon broke the monotony of the cats while complementing the entire design.

I'll be uploading a video nail art tutorial for this design within the week. I'm inviting you to subscribe to my YouTube Channel and join us on Facebook!

So, how did you find my Haunted House and Black Cats Halloween nail design?