Showing posts with label China Glaze. Show all posts

Nail Art: Flower Patches

I want an ombre manicure. This was the inspiration for this floral nail art design. And surprisingly, I used a pink palette! My sister's love for the color is probably rubbing off on me. After painting my digits, I realized this is not the first time I used pink for an ombre nail art. Do you remember my pink birds nail art?

Let me show you what I did this time:

Flower Patches Nail Art Design

Nail Art: Blue Wave

I know that you have noticed that I have been slacking with nail art designs lately. Well, I had some reviews that I wanted to post first and I recently went on a trip with some bloggers all over the Philippines that gave me a hangover because I had so much fun! More on that trip, soon! And finally, because my nail on my right pinky finger broke that I had to patiently wait for it to grow a little so I can file them into a decent shape.

I simply called this nail design -- Blue Wave. I'm not so sure if the title fits the design though. The idea is to create a blue ombre manicure. But before I get into details, take a look at the outcome:

Blue Wave Nail Art Design - Two Hands
Blue Wave Nail Art Design by Simply Rins

Nail Art: Loops

Are you looking for inspiration for a nail art design?

Have you experienced some sort of artist block and can't seem to decide what design you'd like to paint your nails?

Well, if you answered yes to either of these questions, this nail art is for you ... as it was for me too. After weeks of not doing some nail art painting, I didn't really know what design I wanted. I had a few ideas but none appealed to my mood. Simply put, I was confused. But regardless of my indecisiveness, I mixed some paint and got my favorite nail art brush to jumpstart things. I then started painting random loops on one nail and was surprised to have liked the outcome.

Loops Nail Art Design
Loops Nail Art Design by Simply Rins

Nail Art: Playing With "I'm Not Lion"

It has been almost 2 weeks of nonstop rain with strong winds here in Manila and I've been down with a slight fever and a bad cold for a few days now. It has been keeping me away from doing one of the things I love -- nail art. But a couple of days ago, I changed the polish of Nanay (English: mother) and decided to wear the same thing!

We both wore China Glaze I'm Not Lion.

China Glaze I'm Not Lion

Nail Art: Coffee

Warning: this nail art post is rather personal.

I have been struggling with my emotions for the past few weeks and all I ever wanted to do was sleep so that I would not drown myself into serious thoughts. But sleeping is just a temporary escape and eventually I had to deal with the heaviness of my heart. And I thought the best way to start coping is to do the one thing I really love -- nail art.

As the title suggests, this nail design is inspired by coffee. This was not a random idea. My short lived drama started after meeting an old friend for coffee. But first, let's talk about the design.

Coffee Nail Art Design
Coffee Nail Art Design by Simply Rins

Nail Art: Spiderman

June has been a very emotional month and I'm glad it's ending. But one good thing I can look forward to before I say goodbye to June is to watch the latest Spiderman movie. Yes, I am a fan. Having said that, I could not watch without a matching nail art design. So I got busy a couple of nights ago and came up with this:

Spiderman Nail Art Design
Spiderman Nail Art Design by Simply Rins

Nail Art: Blue Rose

One of the good things I like about nail art is being able to match it with any outfit. I've done so a few times and what I am about to share is another. I attended an event last Friday that required us girls to wear a summer dress and I wanted my nails to match.

First, let me show you the nail design.

Blue Rose Nail Art Design
Blue Rose Nail Art Design by Simply Rins

Nail Art: Rose Buds

I have been wanting to paint rose buds on my nails for a long time and during my attempts, I haven't been satisfied until last week. I was going to attend a semi formal event and I was going to wear a black and white ensemble. I wanted my nails to match and I also wanted the design to be feminine, classy, and not too elaborate. If you remember my Scattered Flowers Nail Art, the idea is similar to that but this time, I painted rose buds.

Take a look at what I came up with:

Rose Buds Nail Art Design
Rose Buds Nail Art Design by Simply Rins

Nail Art Tutorial: Collared Nails

A few days ago, I was challenged to create a nail art design that mimics a fashion trend. The challenge came from a nail art contest that megastyleph organized. I actually posted about it here.

Each participant was asked to browse the megastyle website for fashion trends and create a nail design inspired by that. I spotted a photo of accessorizing classic pieces to create a twist and I thought it was perfect to my style of nail art. This is what I came up with:

Collared Nails Nail Art Design
Collared Nails by Simply Rins

Nail Art: Scattered Flowers

I am back for more nail art designs after a very long hiatus. To start things off after a frustrating few weeks, I decided to create something simple, something easy to do. I painted small flowers in random places on all my nails with hope that this would bring some cheer to my gloomy mood. I named this Scattered Flowers simply because they are.

Scattered Flowers Nail Art Design
Scattered Flowers Nail Art Designs by Simply Rins


I have always believed that flowers are classy when it comes to nail art designs and you don't need to paint them with lots of details to create something beautiful.

Scattered Flowers Nail Art Design


For background color, I chose China Glaze Kinetic Candy in 2 coats. I had no problems with the application, no streak marks to worry while doing so. Kinetic Candy is a recent purchase from Digital Traincase and I have been meaning to use it since I got it barely 2 weeks ago. This is a perfect base color for spring or summer. I can see myself using this for more nail designs in the future.

Scattered Flowers Nail Art Design


I hand painted the flowers on my nails using acrylic paint and a detailing nail art brush. They are small 5-petal flowers in pink, a color that I think would really pop on our background color. I also added a few white dots to fill in awkward places around each nail. If you have been following this nail art blog for some time now, you'll probably notice my preference to add tiny dots as details to my nail designs. I really think it gives the nail art a little extra.

Scattered Flowers Nail Art Design


I submitted this design to a magazine and the feature would include a tutorial. I'll be waiting for it to come out before I share more details with you. As for now, I am quite excited. :)

If you are a nail art beginner and would love to try some freehand design, I would recommend you try this. It is simple enough to paint on both your hands.

Nail Art: Here Comes The Sun

The heat is on here in the Philippines as summer is almost upon us. The sun is always out and fans and air conditioners are most often than not in full blast just to beat the hot weather. People in our part of the world are now busy planning their summer getaway, myself included. I'll be taking a short road trip with friends by the end of the month to mark the beginning of summer. I have been doodling some ideas for that trip. But for now, let me share with you my very sunny nails.

Here Comes the Sun Nail Art Design
Here Comes the Sun Nail Art Design by Simply Rins


This is a hand painted nail design that features the sun ... wearing sunglasses.

I am not particularly fond of wearing yellow because I've always thought that it will make me look pale. And as of this writing, I only have 3 yellow nail polishes in my stash. I was hesitant to paint all my nails yellow for that reason. But after polishing my nails, I felt it didn't look as bad as I expected. Or was that because the color is now very appropriate to summer?

Here Comes the Sun Nail Art Design


I painted 2 accent nails, one on each hand and decided on 2 coats of Sally Hansen Cloud Lavender as base color. As the name suggests, it is almost white with a very light purple tint. Application can be tricky and opacity is easily reached in 2 layers.

As for my other nails, I wore China Glaze Solar Power in 3 coats. Its a golden yellow polish that I find perfect for this sun inspired nail art. Application can be tricky. Could be a 2 coater but decided to add another layer for full opacity.

Here Comes the Sun Nail Art Design


The entire design was painted using acrylic paints, detailing and striping nail art brush.

I didn't want to leave the other nails really plain but I also didn't want to drown the sun so I opted for simple diagonal lines. Polka dots would have been a good choice too.

I was playing with some picture effects on my camera and I found this interesting option to just photograph a particular color. I thought it would be fun for this sun nail art design, so I gave it a go. Take a look and tell me what you think:

Here Comes the Sun Nail Art Design


Taking pictures of this particular nail art was fun actually because I didn't have to worry about the glare from my desk lamp to ruin the design. All I kept doing was to position my hands so as to direct the glares to the sunglasses that the suns were wearing. I actually added a few white lines on the shades to depict light only to realize that the painted sunglasses didn't need it during the shoot. Well, those white lines still added detail to the design and my nails wouldn't be catching reflection all the time, right? :P

Here Comes the Sun Nail Art Design


I love summer and I love how this turned out. My nails are ready for the season!

Penny for your thoughts, how do you feel about this sunny nail art design?

Nail Art Tutorial: Dripping Rainbow

This particular nail art is for my friend, Rachelle. I met her just last year. We were both taking an internet marketing class. It was not hard to get along with her. She was very friendly and approachable. One thing you will love about Rachelle is her smile. She never rans out of it and she is definitely the most cheerful person I know.

She recently started a blog called Memos from the Purple Couch with an inspiring tagline -- Can we laugh our way to becoming an empire? She has proclaimed herself CEO, Cheer Executive Officer and everyone agrees it fits her perfectly. Anyway, she has been requesting a rainbow inspired nail art design ever since she found out I was into nail painting. After what seems like forever, I finally got some inspiration on how I wanted this to look like.

Dripping Rainbow Nail Art Design
Dripping Rainbow Nail Art Design by Simply Rins


An open letter:
Dear Rachelle,

I'm sorry it took me a very long time to create the rainbow nails that you have been requesting. I never forgotten about it. I know that this nail design has been recreated so many times and I really just wanted to come up with something different for you. I hope the wait was worth it and that you'll like what I came up with. Your outlook in life has been inspiring and the rainbow is perfect to represent your cheerful personality.

Simply,
Rins

Dripping Rainbow Nail Art Design


I was deliberating whether to use black or white as background. The latter won. I was afraid a dark background will create a gloomy effect regardless of the colors. I opted to use China Glaze Moonlight in 3 coatings to achieve full opacity. This is a very sheer polish and I love it regardless the fact that I needed to apply 3 thin layers. It has a translucent feel to it that I really love and application is easy.

I hand painted the rainbow design using acrylic paints and a detailing nail art brush.

Dripping Rainbow Nail Art Design


My worry about creating a rainbow inspired nail art is how I'll be separating the colors neatly and I really wanted to add a twist to it. This is when I thought of the dripping effect. It eliminated the need for perfect brush strokes and consequently, I knew that it would not be time consuming.

Dripping Rainbow Nail Art Design


I used the acronym ROYGBIV (red, orange, yellow, green, blue, indigo, and violet) as guide for the rainbow colors. To make it easier for me to evenly space the width of each color on my nails, I decided to start at the center using the green color, which is the center color of the rainbow.

The length of each color was painted in random and I added a small blob at the end of each to create that dripping effect. I was also conscious to show some brush strokes towards the end of each color to make the drips more visible.

Dripping Rainbow Nail Art Design


I am quite happy with the results of this rainbow nail design. I would highly recommend this to nail art beginners. It is very easy to create because the need for perfect brush strokes is at a minimum. This makes it easy to work with your non-dominant hand since you're practically just doing one primary brush stroke, that is from the cuticle area down towards the nail tip.

To further demonstrate how I painted this nail design, here's a short tutorial:


Yet another thing I like about this design is the fact that it creates an illusion of longer nails. I hope my friend would forgive me for being so late to oblige to her request for rainbow inspired nail art. Oh, and I wish we could go out for dinner or coffee so I can show her my nails in person. That would be really amazing.

What are your thoughts on this Dripping Rainbow nail art design? I feel this would be perfect for summer.


If you don't want to miss any of my nail art designs or tutorial, please subscribe here.

Nail Art Tutorial - Bear of Pink and Blue

For my last Valentine's inspired nail art, I decided to go for something "cutesy". I chose to wear a deep brown polish for the weekend but I didn't know what design yet. But last night, my mom asked me to paint roses on her nails and she mentioned that pink would look good on my newly polished nails. So when I got back to my personal nail station, I started to think about pink. Surprisingly, bears came to mind. Then I got this idea of painting a bear couple!

Here's the result:

Bears of Pink and Blue Nail Art Design
Bears of Pink and Blue Nail Art Design by Simply Rins


Yes, I painted a pink bear and a blue bear, a girl and a boy represented by color. I patterned my teddy bears to the previous one that I did, that you can view here.

Bears of Pink and Blue Nail Art Design


Base color is 2 coats of China Glaze Ingrid. Fabulous color and is a possible 1 coater polish. It's a deep chocolate brown that has a very shiny finish even without a top coat. Application is smooth and easy. I'd say it's a good choice to bring light colors to life like pink and light blue.

Bears of Pink and Blue Nail Art Design


I decided that the pink bear belongs on my left hand and the blue one on my right. Initially, I wanted to paint them on 2 nails that are beside each other. But I wanted to paint big hearts on the others nails so I decided on having accent nails instead.

Here's a closer look at the pink bear:

Bears of Pink and Blue Nail Art Design


I also was able to create a video tutorial on how I painted the teddy bears. Perhaps this video can address those who requested an actual footage of how I paint designs on my nails.


I also have some good news. I have been meaning to upload a video on how I paint with my non-dominant hand. I finally was able to come up with a decent recording and I'll be sharing it with you on my next post. I know that I have promised this a long time ago and I really had a hard time coming up with a good video. I hope it will be helpful to those who have asked me how I paint with my weaker hand. Stay tuned!

Don't miss any of the updates! Subscribe to Simply Rins and be notified of new nail designs and tutorials.


P.S. I think the video was too bright. :(

Nail Art: Swirls

I was laying late last night, waiting for inspiration to come. But my mind went blank. So in hope that it will visit me sooner or later, I polished my nails with one of my all time favorite polishes, China Glaze Side Saddle. I still wanted to create a Valentine's inspired nail art design. After I finished polishing my nails, I still didn't have a clue what to do. So I went back to bed and stared at the ceiling. A few minutes after, I was preparing for another nail art session with myself.

Hypnosis is the inspiration for this nail design. It hit me when I was staring blankly at the ceiling. I simply called this Swirls and I'm sure you know why. ;)

Swirls Nail Art Design
Swirls Nail Art Design by Simply Rins


Swirls are often how hypnotized characters in cartoons are drawn and that's what came into mind when I thought of using hypnosis as inspiration for this nail design. I wasn't sure how it would look on my nails but I decided to just start painting and follow my instincts. I painted swirls that would cover the entire nail bed and used thick lines instead of thin because I figured that would be easier to paint.

Swirls Nail Art Design


I still wanted this nail art to be fit for Valentine's so I decided on using a pink acrylic color for the swirls. I originally wanted to use red but it would not show well with the base color.

This nail design is quite bold, I think. It may attract a lot of attention to your nails as the lines are prominent. Overall, I think it is a fun and very flexible nail art design. I'm thinking this would look amazing in black and white. It is confusing and beautiful at the same time.

Here's a closer look:

Swirls Nail Art Design


I would recommend this for nail art beginners who would like to practice strokes and would like to get familiarized with their nail art brushes.

Do you consider this nail art a simple design?

Nail Art: Penguins and Snowflakes

Everyone is probably super busy right now, preparing for the celebration of Christmas Day! Here in the Philippines, we are now excited for noche buena, the night of Christmas eve. Family and friends gather together for a feast when the clock strikes midnight on the 25th to celebrate Christ's birthday.

It's the 24th here and I want to share my last Christmas nail design for the year before the lazy bug of the holidays bite me. I decided to wear a nail art that would remind me of the north pole. It was a choice between polar bears and penguins. The latter won.

Penguins and Snowflakes Nail Art Design
Penguins and Snowflakes Nail Art Design by Simply Rins


This is a freehand nail design of penguins and snowflakes. I painted 4 penguins with scarves, 2 on each hand. I would have wanted to paint 10 penguins, but I was pressed for time. On the other nails, I painted snowflakes.

Penguins and Snowflakes Nail Art Design


Base color for the penguins is Sally Hansen Black Out in 2 coats. This is my ultimate favorite black so far and my bottle is almost out. Have to buy a new one soon. For the snowflakes background, I used 2 coats of China Glaze Blue Sparrow. It's one of my favorite bright blues that I think is perfect for the holidays.

All designs were painted using acrylic paints, a detailing and striping nail art brush.

Penguins and Snowflakes Nail Art Design


I painted the scarves for the penguins as nail tips of alternating red and green, to keep it simple. I also added pink blush on the cheeks for cuteness and I figured their cheeks are naturally rosy because of the cold weather from where they live.

Penguins and Snowflakes Nail Art Design


And so yes, I'm wearing penguins and snowflakes for Christmas. It's a wonder I am not wearing something red, my ultimate favorite color and consequently, the color of the season. I guess I needed something different.

I'd like to end this post by greeting all of you, whom I consider my friends, a Blessed Christmas. :)

Nail Art: Manny Pacquaio ... Again

Clearly, this is not another Christmas nail art idea. Please forgive me that I am now breaking my promise of sharing a series of nail designs inspired by the yuletide season that started with my Christmas Garlands nail art a few days ago. I have a good reason for this, promise!

This nail art is a tribute to Filipino pound-for-pound boxer, Manny "Pacman" Pacquaio, who successfully defended his welterweight title against challenger, Juan Manuel Marquez last November 13 at MGM in Las Vegas. Once again, you gave pride to your fellow Filipinos. We are truly proud of you. And since nail painting is what I love to do, I hope this Manny Pacquaio inspired nail design is enough to show my appreciation to your dedication and hard work.


Manny Pacquaio Nail Art Design by Simply Rins


Base colors are Sally Hansen Black Out for black and OPI Alpine White for accent nails, polished in 2 coats. All designs were hand painted using acrylic paints and nail art brushes.

I made 4 accent nails, 2 on each hand.


I painted Manny Pacquaio's face and his name logo on my left hand. I was tempted to replicate how I painted his portrait on my first Manny nail design, but decided to come up with something different since he doesn't wear a full moustache anymore. I know in my heart that I could have done a better job with this but honestly, my hands were shaking when I was doing this. I'll get to that later. ;)


On my right hand, I chose to paint boxing gloves to represent the sport of boxing. Like I always do, I try to place a simpler design on my right hand as I'll be working with my weaker hand. The gloves, I think, is a good choice.

I wanted to paint the Philippine flag in one of my nails but we were running out of time. I'll explain this in awhile. ;) I didn't want to leave the other nails bare so I figured I'd paint some stripes using the colors of our flag. It was a good compromise and I liked it.

Okay, so why was my hand shaking and why didn't I have time to paint our country's flag? You see, a few days ago, I gladly obliged to a request by a local television network to feature my Manny Pacquaio nail art. Yesterday was the day of the shooting and I was really nervous that my hand kept shaking. They also wanted to cover a lot of nail art ideas that I didn't have enough time to do the flag.

Here's a glimpse of the shoot:


I was particularly excited for this feature because I did the design on my own nails! I know I don't have exactly the prettiest hands, but this opportunity is a dream come true for me. I have long wanted to record on video how I paint my nails. But nail artists would agree that we can't just place our hand flat on the table all the time, so mounting a video camera on a tripod simply wouldn't work all the time. But having a cameraman scrutinizing me while I work made me really conscious that I made some erasures on the design during the shoot. In fact, I was more nervous working on my nails compared to the short interview. Nevertheless, the experience was awesome!


The feature will be aired this Sunday, November 20 at GMA News TV, Channel 11 at 8:00pm. Other Manny Pacquaio inspired creations by other Filipinos will also be featured. If you have time, I hope you can watch the news segment and perhaps you can get a glimpse of how I paint my nails!

To my international friends, I will be posting a video of the segment once it has been uploaded by the television network.

To everyone, thank you for appreciating my nail designs. It is because of you that opportunities like this knocks on my door.

Nail Art: Christmas Garlands

I'm starting Christmas early here at Simply Rins by sharing with you my first Christmas nail art idea for this year. I decided to come up with something simple and festive. I recommend this for nail art beginners. It is relatively easy to do, even when you're working with your non-dominant hand.

My inspiration for this Christmas nail design is a popular decor for the season -- garlands!

Christmas Garlands Nail Art Design
Christmas Garlands Nail Art Designs by Simply Rins


For the base color, I used 1 coat of Orly Kiss The Bride and layered it with 2 coats of China Glaze Cloud Nine. I love this shimmer nail polish. It gives a subtle gold glitter that I think is perfect for the holidays.

Christmas Garlands Nail Art Design
left hand


I decided to paint the garlands differently on each hand. Red garlands for my left hand and green on my right. I used Color Club Ruby Slippers on my left hand and Orly Meet Me Under The Mistletoe on my other hand.

For a more garland effect, I used a dotting tool and used a dabbing technique to paint garlands on my nails. The lines that would serve as garlands is prettier with irregular edges.

Christmas Garlands Nail Art Design
right hand


I randomly placed gold micro beads for further details. These beads are almost always bleeders once you put a top coat over them. To make sure the bleed wouldn't be as evident, I was careful to place the micro beads inside the red and green glitter polishes that I used for the garlands.

Christmas Garlands Nail Art Design


You may opt to use more colors of the beads for a more festive look. As for me, I decided to just use one color -- gold, for this Christmas nail art design. Overall, I was satisfied with how this turned out. I found it interesting and classy. What do you think?

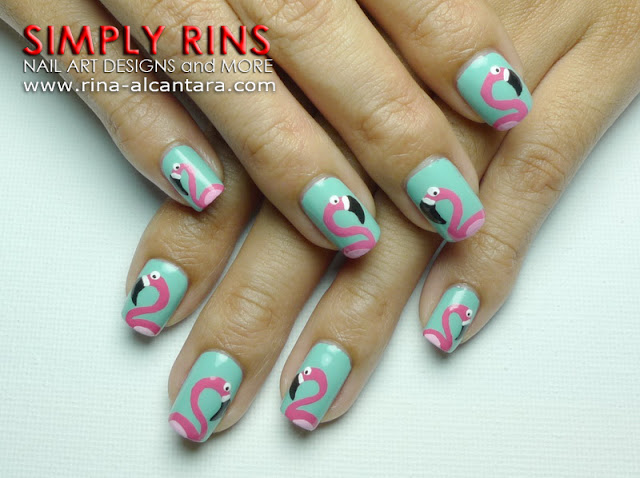
Nail Art: Fun With Flamingos

A few hours ago, I had a dilemma. I wanted to paint a bird-inspired nail art design on my nails and I didn't know what kind of bird to choose. I literally stared at my 1 day old polished nails to get some ideas. Then it hit me that I want to paint pink birds! So I got my nail art tools ready only to realize that I still don't know what type of bird I really want to paint. Okay ... I know I want pink birds so I need just ask myself what's a popular pink bird? Of course, flamingos! Yes, this is a flamingo nail art and I think it goes really well with my chosen base color.

Fun With Flamingos Nail Art Design
Fun With Flamingos Nail Art Design by Simply Rins


Background polish is 2 coats of China Glaze For Audrey. I've seen this color in several nail blogs and I immediately fell in love with it. Unfortunately, I only got my hands on it a few weeks ago during one of my shopping days. I think the pink flamingos complement For Audrey perfectly.

This is a freehand nail art design and I used acrylic paints for drawing the flamingos.

Fun With Flamingos Nail Art Design
A closer look at the flamingos.


I had quite a difficult time painting this magnificent bird with my non-dominant hand particularly because of the bird's long and curvy neck. You really need a good detailing nail art brush and the right acrylic paint consistency to make your strokes manageable. Otherwise, drawing curves will deem very difficult.

Fun With Flamingos Nail Art Design


As I look into the photos of this flamingo nail art, I thought that a light yellow base color would also look great. That would definitely bring out the pink color. If you have lesser time to do your nails, I recommend painting at least 2 flamingos, facing each other. These birds are famous for creating that heart shape with their necks, right? For this nail design, I did a pair on each hand to help me keep the faith that LOVE is just around the corner.

Fun With Flamingos Nail Art Design


I hope you liked this flamingo nail art design as much as I do. I may not be fond of pink, but I am definitely a fan of flamingos and I figured I'd have fun with them with this nail art.

Christmas will start early here on Simply Rins so I could accommodate as many requests as possible. I'll start next week, promise. :)

Nail Art: Halloween Cupcake

October is on its last week and Halloween is almost upon us! Have you decided how you will wear your nails for the event? Perhaps this 7th installment for my Halloween nail art ideas series can inspire you. As you may already know, I am very fond of my cupcake nail design that I've recreated it to match several occasions. This is another cupcake design, this time, for Halloween. Instead of adding cherries on top, I added little pumpkins!

Halloween Cupcake Nail Art Design
Halloween Cupcake Nail Art Design by Simply Rins


Base color is just a base coat. I used 3 coats of China Glaze Orange Knockout (Neon) for the cupcake holder, painted on the nail tips. For the cupcake itself, I used Lucidarling white shimmer nail polish. For the stems, I used China Glaze Tree Hugger.

All other details were painted using black acrylic.

Halloween Cupcake Nail Art Design


This Halloween cupcake is a simple freehand nail art design. I didn't add the usual sprinkles because I wanted the pumpkins to standout. I also painted a smiley face on the small pumpkin toppings just to make the design more interesting.

Halloween Cupcake Nail Art Design


Tutorials for the previous Halloween designs will be posted soon. My apologies for the delay. I just came back from a mini break with my mother and sister. For the meantime, I hope you find this Halloween nail art design inspiring. I wore this during our short vacation and I was really fond of them.

What do you think of this design?