Showing posts with label Deborah Lippmann. Show all posts

Nail Art: No Direction

I share with you another abstract nail art. Abstract has always been my go-to for times when I don't have anything specific in mind for a nail design because I can just let brush strokes be spontaneous.

Often, my manicures have a some sort of a story behind it. I mean, it tells how I feel or what message I want to bring across. I take nail art to be very personal, that it tells a bit about myself. Allow me first to show you what I came up with before anything else:

No Direction Nail Art by Simply Rins

Nail Art: Fantastical Sponged

Clearly, I can't get enough of Deborah Lippmann Fantastical Collection from 2014. I've already tried water marbling using the set, and now I'd like to share a simple sponge manicure using 3 colors from the collection. This is easier to do than water marble and I think this technique could result to more possibilities.

The one I will be sharing today is the outcome of swiping the sponge once from one side of the nail to the other. Here it is:

Fantastical Sponged Nail Art Design by Simply Rins

Deborah Lippmann Fantastical Collection (2014)

Before anything else ... HAPPY NEW YEAR to everyone!

I'll be starting the new year with a swatch and review post of Deborah Lippmann Fantastical Collection 2014. I wanted to publish this before the end of 2014, but I wasn't able to. But if you can remember, I used the collection for a nail art feature which I actually wore during my short vacation. I called it Fantastical New Year 2015.

There are 6 shades in this 2014 Holiday collection and most of them are really sheer. Some are fantastic for layering! Are you ready?

Deborah Lippmann Fantastical Collection (2014)

Nail Art: Fantastical New Year 2015

I will just have to say what has been said more than a million times ... time flies! In a matter of days, we will be welcoming a new year! I am currently rushing as I still need to finish packing for an out of town trip. This would be the second time that I'll be celebrating New Year far from home. Regardless if I have a very persistent cold, I am bound to go somewhere in the north. Of course I cannot just leave without a nail art to celebrate the coming year. ;)

I did some marbling (yes, I did!) and the results were magical:

Fantastical New Year Nail Art Design by Simply Rins

Nail Art: Paper Roses

There are several ways of painting roses. Here's another one that is relatively easy to do. I named this floral nail art "Paper Roses" mainly because it was my inspiration. I used to love origami and if I remember it correctly, it was my mom who taught me how to make roses using a gift wrapping ribbon. I drew this nail design as if it were papers folded to form roses. I hope you'll like it as much as I do.

Take a look:

Paper Roses Nail Art Design by Simply Rins

Nail Art Tutorial: Skulls and Bones

I simply love how this Halloween nail art turned out. It looks complicated at a glance, but is absolutely easy to do. And I am happy to say that this is the 5th design for my 2014 Halloween series.

As the title suggests, this nail art was inspired by skulls and bones. I've done skulls for 2 straight years. Skull Skittles last year which was actually just a recreation of Colorful Skulls. But what I am about to share here is different and I hope you'll like it as much as I do. I feel a little weird though because I had mixed feelings with my previous bats nail art and all of sudden I feel thrilled about this!

Here it is:

Skulls and Bones Nail Art Design by Simply Rins

Nail Art: Graveyard, Too

It has been a week since my last nail art post and it was completely unintentional. I had a serious cut on my left index finger and it was rather painful when pressured is applied. I couldn't even apply nail polish properly. My bad. But I am back and I am very excited to share with you the 3rd installment to my 2014 Halloween nail art series!

I am particularly proud of this one because it took me a longer time than usual to be able to do this. I called it "Graveyard, Too" just because I already made a nail design of the same theme last year that I simply named, Graveyard. I did it a little different this time.

Check it out:

Graveyard, Too Nail Art Design by Simply Rins

Nail Art: Blue Scratches

When I moved to the new place a few months ago, I adopted a stray cat and named her "Floozie". Not that she is one, I really just like that name. I actually used that as a character name when I was still into online gaming. A shocking revelation? But let's not get into that. It was too long ago since I played. This post is about how my feline friend inspired this freehand nail art.

It is my first time to have a cat as a pet. We always had a dog. And Floozie wasn't a domesticated cat when she came into my life (or house). I didn't know much about cats. So during the times I tried to bath, cuddle, or play with her, I sometimes get scratched. I have a lot on my legs and arms. Thankfully, she is more at peace with me now and I have less and less scratches.

This nail art is to remember her (playful) scratches:

Blue Scratches Nail Art Design by Simply Rins

Nail Art: 80s Gradient

This is probably the first time you'll see a gradient manicure here in my blog. I didn't think it was my style until recently when I reviewed the Deborah Lippmann 80s Rewind Collection. I chose 3 colors from the collection and thought it would look great together. I initially wanted to use all the 6 shades, but my nails are not long enough to accommodate all 6. It probably would look like rainbow nails, which would be really nice.

Without further a do ...

80s Gradient Nail Art Design by Simply Rins

Deborah Lippmann's 80s Rewind Collection (Summer 2014)

It is no secret that I am a fan of Deborah Lippmann's nail lacquers. Its signature polish bottle is one of the most recognizable in the market. It is also one of the most sturdiest bottles out there and they can easily be stored in a polish rack without taking up too much space. Most importantly, the brush is short and slender which I realize is more manageable during application especially if you like polishing your own nails.

This summer, the company has come up with a vibrant collection, the 80s Rewind Collection. It's composed of 6 vivid cremes inspired by songs during the 80s. Now this is a collection a lot can relate to and would definitely enjoy. If you collect memorabilias from the 80s, you'd probably get this set on a whim! It's a good addition.

Here's a quick look at the collection:

Newspaper Nail Art

So I finally got to do newspaper nail art and it was featured on the Philippine Daily Inquirer newspaper last August 16, 2014. Newspaper nail art for a newspaper! How cool is that?!

The opportunity required that I use pages from the local publication to do a photo tutorial on how to create a do-it-yourself newspaper nails. The tutorial appeared on the Lifestyle section, under "Superecycle". Aside from the step-by-step procedure, I also included personal tips on how to do this fun nail art design.

Simply Rins on Philippine Daily Inquirer

Nail Art: It's My Birthday

I am officially a year older. I turned 38 last May 25. I have been meaning to spend a birthday on an outdoor adventure. And after 3 years of trying, I finally did it this year. I initially wanted to spend it in Bohol. But the turn of events led me to celebrate my 38th in Palawan, Philippines.

I also planned to share my birthday nail art before I left for my trip. Unfortunately, I misread my flight schedule and had to rush to the airport so early in the morning to catch the plane. Instead, I brought with me my nail art kit and hoped that I will have time to do my nails while on vacation. Well, I was able to just in time for my special day.

Take a look:

It's My Birthday Nail Art Design by Simply Rins

Deborah Lippmann: Mermaid Collection

The Deborah Lippmann Mermaid Collection came out 2013. So I have no excuse of only being able to swatch it now. It is a collection born out of "Mermaid's Dream", the first color that came out that instantly became a fan favorite. It was also the first bottle that I got. I have worn it several times and my mom loves the shade too.

It is only apt that I start with this color as it launched 4 more gorgeous shades:

Deborah Lippmann: Mermaid's Dream

Deborah Lippmann Run the World ... and Some Flowers

Two months ago, my mother surprised me with this:

Deborah Lippmann Run the World (Girls)
Deborah Lippmann Run the World (Girls) Collection

It's the Deborah Lippmann Run the World (Girls) neon minis collection and it comes with an interesting box. I've recently acquired a lemming for polish minis and I was completely amazed when nanay (mother) handed this to me because I didn't know that Deborah Lippmann released such a set. Needless to say, I loved it.

The box cover had a printed hand on it and the nails were cut off so the mini polishes inside could act as nail colors. Brilliant!

Nail Art Tutorial: Dark Shadows (Barnabas Collins)

It is not a secret that I am a fan of actor Johnny Depp. I think he's an amazing actor and he has established himself as one by successfully portraying colorful movie characters such as Edward Scissorhands, Ichabod Crane, Willy Wonka, and of course, Capt. Jack Sparrow. The last nail art I did that was inspired by him was this -- Nail Art: Pirates of the Caribbean. Last night, I was inspired to create another nail design for his current movie, Dark Shadows. I simply cannot watch this movie without a matching nail art. :)

This is what I came up with:

Dark Shadows Nail Art Design
Dark Shadows Nail Art Design by Simply Rins

Deborah Lippmann's Edge of Glory II

Last month, I blogged about Deborah Lippmann's Edge of Glory and how much I wanted to own one. Unfortunately, I've had a few bad experiences with international online shopping and so the Edge of Glory set remained in my wish list until Sol of Digital Traincase made it possible for me and other polish collectors or enthusiasts here in the country to grab one. This limited edition set was available at Digital Traincase early this month and I just got mine delivered last week!

Deborah Lippmann Edge of Glory


The Edge of Glory is a collaboration between Deborah Lippmann and Lady Gaga for the Gaga's Workshop at Barney's New York. It consists of 2 nail lacquers. One is a regular polish in black and the other is a 3D holographic glitter polish. It comes in a unique hard board packaging that actually made me want the set even more.

Swatches

The regular nail lacquer is a basic black that has a very shiny finish even without a top coat. I could see myself wearing it without the holographic top coat. Application is easy and opaque in 2 coats.

Deborah Lippmann Edge of Glory
Deborah Lippmann Edge of Glory Base Polish
photographed without a top coat


The top coat is a holographic glitter that gives a 3D effect on your nails, especially when hit by light. On my nails, it gives a more purplish look.

Deborah Lippmann Edge of Glory
Deborah Lippmann Edge of Glory 3D Holographic Glitter Top Coat
photographed without a top coat


The holographic top coat is versatile and can be used with other nail lacquers. One could already see the play of colors inside the bottle but could only truly appreciate it once applied.

Deborah Lippmann Edge of Glory
Deborah Lippmann Edge of Glory 3D Holographic Glitter Top Coat
photographed with a layer top coat


Deborah Lippmann Edge of Glory originally retails for $45 and later at $29 at Barney's New York. If you are a nail polish collector or simply love Deborah Lippmann (like myself), you would surely love to have this limited edition on your helmer or stash.

Deborah Lippmann Edge of Glory


If you are here in the Philippines and would love to purchase the Edge of Glory, there are a few more available at Digital Traincase that you can order here. It retails for Php1900 per set or approximately $45. The price is already inclusive of taxes and shipping expense to bring these babies over here. That is actually a very good deal by my book.

Deborah Lippmann's Edge of Glory

I have always been a fan of Deborah Lippmann nail lacquers. It is relatively more expensive here in the Philippines and not all colors are available. Online shopping could have been an option if only they ship to our part of the world. Unfortunately, most merchants do not or if they do, the shipping cost is just way too much.

I still have a few lemmings from the Deborah Lippmann collections and one of them is the Edge of Glory, concocted by Lippmann and the famous Lady Gaga for the Gaga's Workshop at Barney's New York. This set is a combination of regular and holographic glitter polish that creates a 3D effect.

Deborah Lippmann Edge of Glory


The set comes in a fabulous package that actually makes me want to own it 100x more. I never thought I could get a chance to purchase a set for myself until Sol of Digital Traincase gave me the most wonderful news. She's bringing in a few sets here in the country!

If you are interested (and I know you are) in getting your hands on this limited edition Deborah Lippmann's Edge of Glory, you may contact Sol at the following:

Facebook: http://facebook.com/digitaltraincase
Multiply: http://digitaltraincase.multiply.com/ or http://beautygeeks.multiply.com/

I love Sol and I love Digital Traincase. She makes it possible for polish addicts like myself here in the Philippines to have access to new collections and brands that are not available locally. I don't mind paying a little more for her nail polishes for that reason alone.

Follow my blog with Bloglovin

Nail Art: Chinese New Year 2012

On January 23, the Chinese will be celebrating its 4709th year. Here in the Philippines, the Chinese New Year is considered one of most important and most celebrated festival among the Filipino-Chinese community. My contribution to this occasion is a Chinese New Year nail art.

The Chinese New Year does not have a specified date. It varies every year, depending on the lunisolar Chinese calendar. This calendar is marked by 12 animals that comprises the Chinese Zodiac. 2012 is the year of the dragon.

I created this freehand nail design using the traditional red and gold colors of the Chinese, added a dragon and a Chinese girl as nail accents.
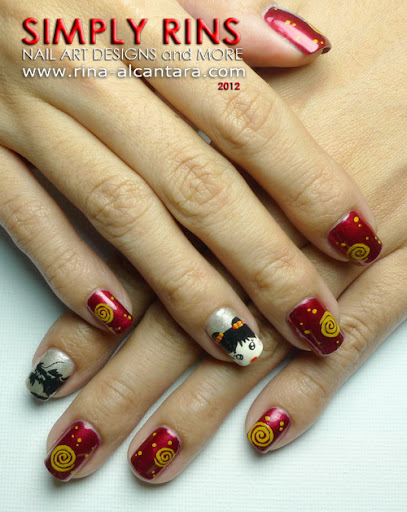
Chinese New Year 2012 Nail Art Design


Each year, Chinese communities all over the world celebrates the coming of a new year with hope of attracting prosperity, peace, and closer family ties. Here in our country, I have witnessed Chinese families preparing and displaying a variety of food for the festival. Dragon parades and dances are also practiced, particularly in China towns across the country.

Chinese New Year 2012 Nail Art Design


Base color is 2 coats of A-England Perceval. A lovely metallic red. Application is smooth and easy. I polished Deborah Lippmann Believe on both accent nails.

I painted all designs using acrylic paints and a detailing nail art brush.

Here is a closer view of the 2 accent nails:

Chinese New Year 2012 Nail Art Design


A week ago, my nail on my left ring finger broke. Normally, that would bring me down and I'd lose my motivation to do some nail art. Well, it still did ... a little. But I figured my readers are forgiving and they wouldn't mind if I post nail art photos with one of nails falling short in length. I'd like to wait for it to grow back instead of trimming my other nails. :)

Chinese New Year 2012 Nail Art Design
Dragon head as accent nail on my left hand.


I wore 2 accent nails for this nail design. I painted a silhouette of a dragon on my left index finger to represent that 2012 is the year of the dragon. I wanted to paint at least half of the dragon's body but since I have relatively short nails, I decided to just paint the head. I'm quite happy with how it turned out.

Chinese New Year 2012 Nail Art Design
A cute Chinese girl as accent nail on my right hand.


On my right hand, I decided to paint a Chinese girl. But instead of giving her the squinted eyes of most Chinese, I gave her big round eyes. I added a few eyelashes on the side of each eye and I think that made her look more Chinese, aside from her hairstyle. I love how she turned out too. She looks like a very sweet kid.

Chinese New Year 2012 Nail Art Design


I didn't want to leave the other nails bare. I chose to paint swirls and dots since round objects were always considered lucky by the Chinese people and I want that to reflect on my Chinese New Year nail art design! I didn't have a gold acrylic paint so I thought of mixing a golden yellow shade.

This nail design is particularly dear to me as I was born on the year of the dragon and I'd like to believe that this would be an amazing year for me. I'll be keeping the faith that 2012 will turn my life around.

Will you be wearing a Chinese inspired nail art to celebrate the Chinese New Year? What are your ideas?


I hope you enjoyed this freehand nail art design. I'm inviting you to subscribe to this nail art blog to receive updates whenever a new design is uploaded.

Nail Art Tutorial: Snowman Parade

I apologize that I am unusually late for sharing this Christmas nail art design. I got too fond of my Reindeer nail art that I wore it for almost a week! Also, I broke a nail and thought it was a sign to give my natural nails a few days rest from nail polish and acrylic paints.

This is a freehand Christmas nail design that puts snowman on center stage. We may not have snow here in the Philippines, but I have always been fascinated with how creative people are when building a snowman. And since I am still in that crazy mood, I decided to paint 10 snowmen on all my 10 fingernails! I named this Snowman Parade simply because there are so many of them on my hands, as if they're parading. :)

Christmas Snowman Nail Art Design
Snowman Parade Nail Art Design by Simply Rins


I honestly wanted to just do at least 4 snowmen since I didn't have much time. But after painting 4, I wanted to do more. And so I continued before I went to bed last night.

Christmas Snowman Nail Art Design


Base color is 3 coats of Deborah Lippmann Believe. The beauty of this beige or gold shimmer nail lacquer was also one of the reasons for this late post. I wore it for almost 2 days just as she is. This bottle was a recent gift from nanay (English: mother). Don't you just love my mom! She has been buying me nail polishes since I embraced my passion for nail painting. The support is just overwhelming. :)

Christmas Snowman Nail Art Design


Instead of drawing a full body snowman like I did here, I decided to just paint the head and part of his body. I wanted a close-up version.

I painted 10 scarves in different colors to show that each snowman has its own personality. However, they are all wearing the same hat. An option would be to paint the headgear the same color as the scarf.

I'd like to show you the 2 fattest snowmen I painted:

Christmas Snowman Nail Art Design


My thumbnails are unusually wide compared to my other nails. So most of characters that I paint on them are significantly chubbier. It just couldn't be avoided! But I love the idea of having 2 characters stand out in nail designs such as this.

I prepared a short nail art tutorial if you are interested to try this Christmas nail design:


Thank you so much for watching. If you found that tutorial inspiring or helpful, please subscribe and get updates whenever a new nail art tutorial is uploaded.

I hope you enjoyed this Christmas Snowman Parade nail art design. Please let me know how you feel about them. :)

Nail Art: Up With Flowers and a Wedding

Truly, time flies. It's August already. Soon, the holidays will be upon us again. This is my first post for this month and it is something special to me.

A friend who has been working in the U.S. for more than a decade now got married here in Manila last weekend. When she informed me earlier last month about her wedding, I was overwhelmed. Simply because it has been ages since I last saw her and we barely got in touch. Life happened.

Anyway, before I get too mushy, I made another floral nail art design for the wedding. I called this "Up With Flowers" as I wanted to create a depth effect. I painted the flowers from my nail tips up making sure the sizes to smaller until I just made dots.

Up With Flowers Nail Art Design
Up With Flowers Nail Art Design by Simply Rins


Base color is Deborah Lippman Bitches' Brew in 2 coatings. This is a very deep red. I chose this color because it matched my dress perfectly and I wanted the design to stand out on a dark background.

I hand painted the flowers with acrylic paint. I chose a very light pink shade for the flower petals and a darker pink for the center and to create shading on the top portion of the design.

Up With Flowers Nail Art Design


Here's a closer shot of the flower nail design:

Up With Flowers Nail Art Design


I hope I did a better job on the application. I sort of made a mess near my cuticle area. I'm sorry about that. The result looks like Cherry Blossoms from a distance because of the colors but I liked the way the flowers neutralized the dark base color.

Below is a photo of the bride and myself on her special day. I hope she wouldn't mind that I post this picture here.

Suzee and Simply Rins
Suzee and I


It felt really nice to see her after so many (many) years. I was speechless and happy at the same time. I knew the night would not be enough to catch up but being able to chat with her before the day ended was good enough for me. I hope it would not take another decade for us to see each other again. To my friend, if you ever get to read this, I truly miss you. I wish you best.

How do you feel about this floral nail art design for a wedding? :)