First, I think we need to establish our definition of nail art. In my opinion, any form of decoration one puts on her nails is considered nail art. The mere application of nail polish is nail art, don't you think so? The vast choices of colors is enough to give a girl an headache just to make a decision which shade to wear.
There are a lot of ways to do nail art. But for this article, I'll try my best to address the concerns of those who would like to try freehand nail painting. Hopefully, this will be helpful.
I think the hardest to decide on is where to start. Personally, I recommend working with something quite easy to practice with -- dots! One will be able to do several nail designs with dots. Although dotting tools may seem a requirement, it is not. You may use a toothpick, a dry pen, or even an end of a make-up brush that you're not using already.
Here's a tutorial on how I paint polka dots:
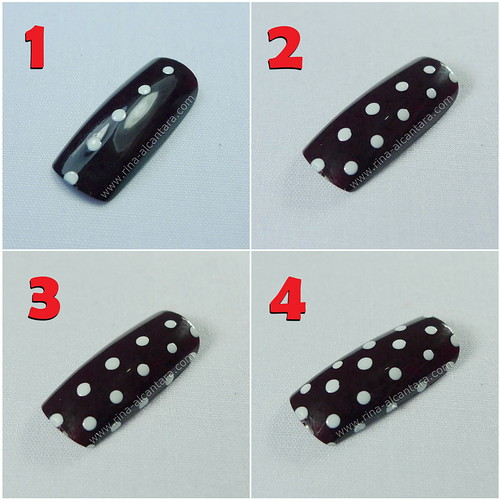
1. First, based on experience, I find it easier to start in the middle of the nail and work your way down.
2. Next, draw dots on the left or right side. Make sure you alternate the horizontal alignment of the dots from the first dots you drew in the center of your nail.
3. Continue painting the dots using the the method mentioned in step 2.
4. Enjoy your polka dots nail art!
I believe polka dots is a classic design. It may be used on an accent nail or combined with it. I used dots in some of my nail designs such as Teddy Bear and Bed of Roses. Try big dots, small dots, or combine both!

Dots can also be used to create other designs. Here are a few ideas:
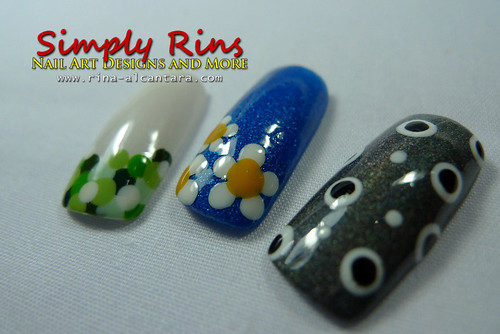
The leftmost design is simply overlapping dots of different colors. In the design above, I used different shades of green and added a few white dots. You may opt to do this using different dot sizes or you may choose to go with a consistent size. I chose the latter.
The next design is using dots to create a floral design. I painted small dots for the petals and a bigger dot for the center of the flower. Again, size is all up to you. If you want a smaller flower, use smaller dots.
Design on the farthest right is another version of overlapping dots.
These are just a few samples of what you can do with dots. I'm sure you'll be able to come up with more amazing designs!
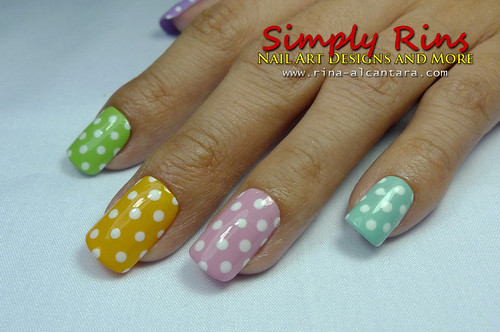
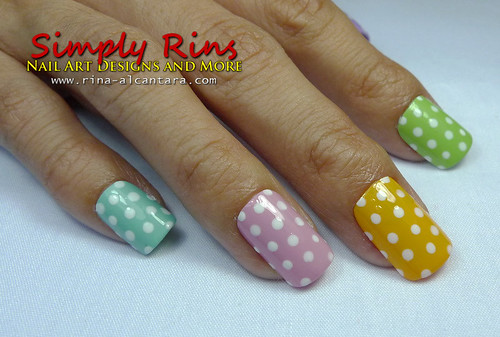
Summer is almost here in the Philippines and so I decided to create a summer inspired nail art using polka dots to show you something also in line with this article. The season reminds me of pastels and wearing those that are dainty. This is the nail design I came up with:

Summer Polka Dots nail art by Simply Rins!
I used a different color for each nail and painted white polka dots on each. I personally prefer darker shades to pastels and so I was surprised to find out that I actually have enough pastels on my stash to work with! These were the base colors that I used:

From left: Orly Green Apple, Orly Cupcake, Dashing Diva Pier 39,
OPI Do You Lilac It? and OPI The "It" Color
I used 2 coats for all polishes except for the Dashing Diva Pier 39 that took 3 coats to reach full opacity.
I truly hope that this post is helpful to nail art beginners.
I appeal to my fellow nail artists to use the comment section to add more tips and suggestions for those who'd like to try freehand nail art. :)
Disclosure: I'm currently resting my natural nails to recover from breakage and brittleness. This design was done using artificial nails.
SHARE THIS: