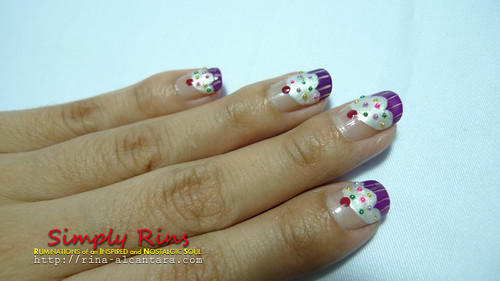
Cupcakes with sprinkles!
I used the following nail polishes for this cupcake nail art:
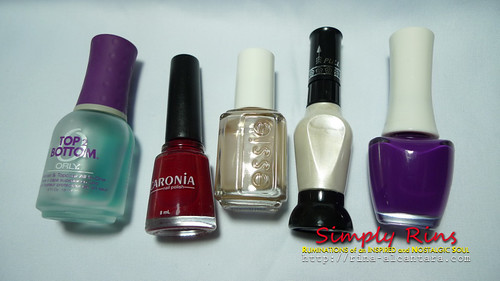
- Orly Top 2 Bottom Base and Top Coat
- Caronia Brick Red
- Essie Au Natural
- Faceshop PP403 (the purple nail polish)
- White nail polish with tip
How I did it:
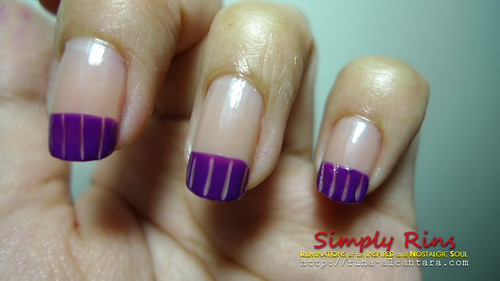
First, I applied a layer of base coat and 2 coats of the Essie Au Natural nail polish. I decided on the color purple for the cupcake holder. I applied 2 layers of the Faceshop PP403 on the tips of my nails. To add details, I quickly drew vertical lines using a dotting tool before the polish completely dries.
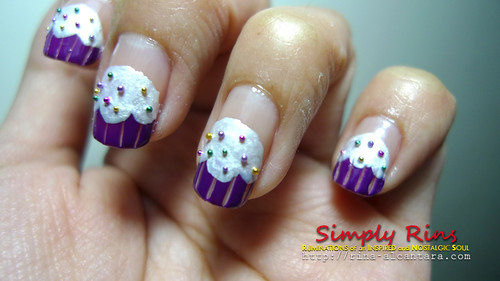
I drew the cupcake itself with the white nail polish with tip tool and added different colors of tiny beads to act as sprinkles. I used a nail dotting tool with a very small amount of clear polish on the tip to pick up the beads and place them on my nails while the white polish is still a little wet. I then pressed the beads a little firmly down to make sure they stick to the design. I used an orange stick for pressing.
I added the cherries on top of the cupcake using Caronia Brick Red. I used an orange stick to create the small red dot. Just dip the orange stick into the red polish and dot on to nail until desired size is achieved.
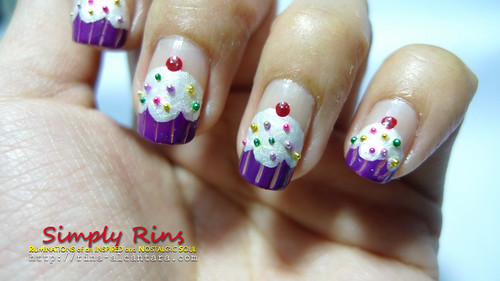
Tadah! Here's how it looked after applying a generous amount of top coat. Since I've been layering with lots of nail polishes, I decided to let the design dry for at least 15 minutes before applying a top coat. On my 1st attempt, I noticed that the color of the beads bleed when I applied top coat. It's the reason I had to redo my pinky finger! Anyway, to remedy this, I applied a thick layer of top coat with light strokes.
This would be the first time that I'll be posting a picture of my right hand. First, it's hard to hold the camera with my left hand. Second, I can't draw as well with my left. But as my partner says, practice makes progress. So starting with today's nail art post, I'll be including photos of my right hand.
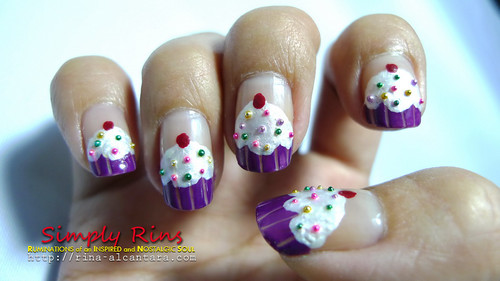
Cupcakes too on my right hand!
I just came to me that I could have used different colors for the cupcake holders!
Personal Tip:

When picking up the super duper tiny beads, I suggest you gather them first on one corner of your container to make it easier to get just ONE bead at a time. Dip the dotting tool first in a clear nail polish before doing this. Place your dotting tool at the edge where the beads are gathered and carefully get a bead. If you place the dotting tool on top of the pile, chances are more than 1 bead will stick to the tip. You don't want this to happen because it will waste your time and you have to work quickly before the polish on your nail completely dries.
If in case the polish on your nail dries while you're adding the tiny beads, just dot a clear polish onto your nail where you wish to put a bead.
Hmm ... makes me want to grab dessert!
SHARE THIS: